
Help Center
Guides for importing documents, creating extracting rules, exporting data, connecting integrations and managing your account. Pick a topic below, use the menu on the left, or press Ctrl K to search.
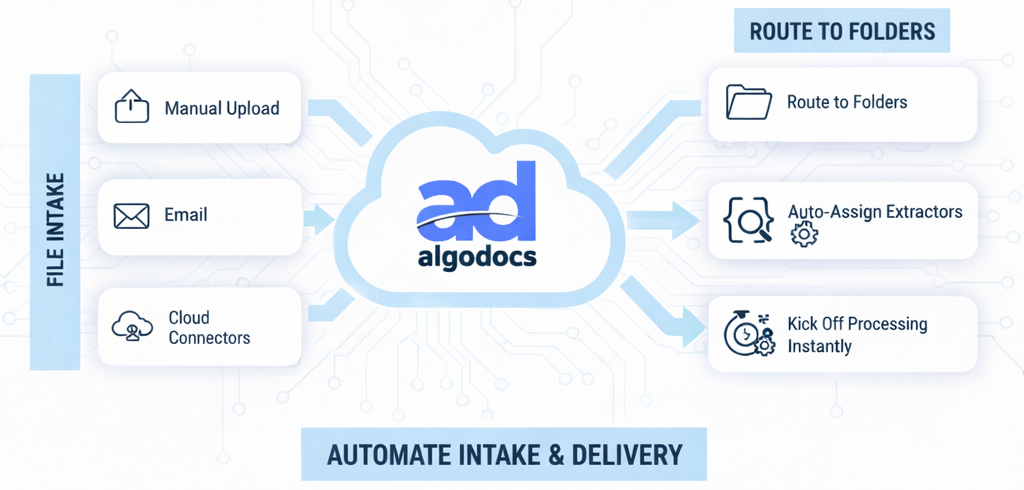
Importing Documents
Bring files into Algodocs via manual upload, email, or cloud connectors. Route to folders, auto-assign extractors, and kick off processing instantly.
Explore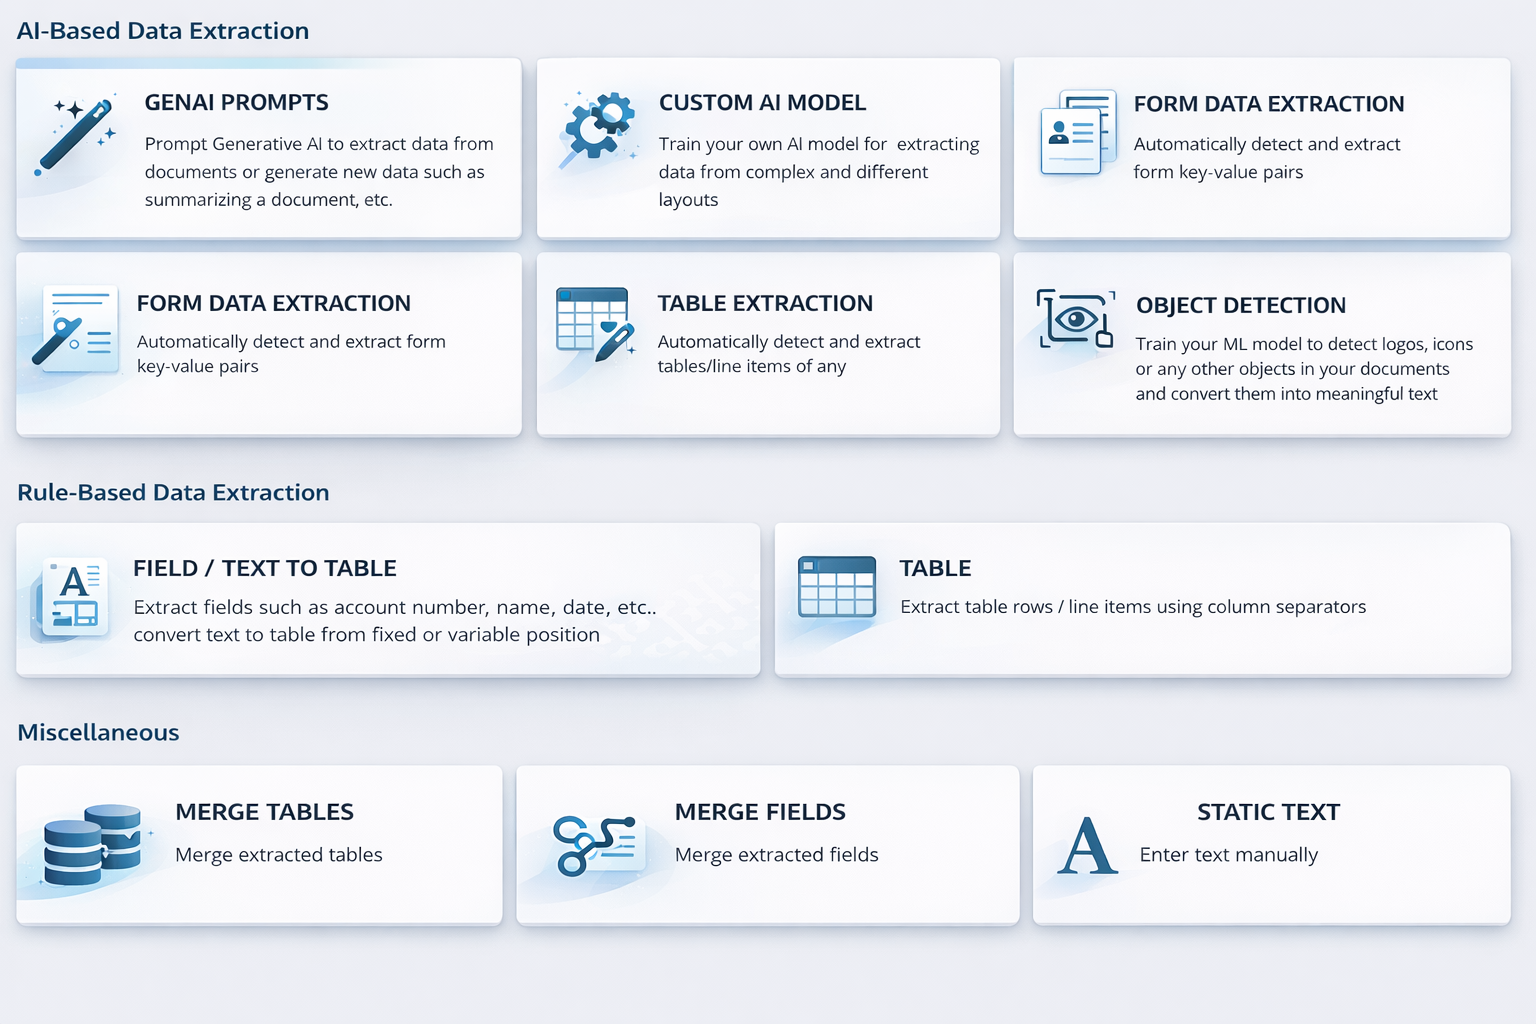
Extracting Rules
Create rules for text, numbers, dates, and tables. Use filters, regex, and keyword logic for high-accuracy capture.
Explore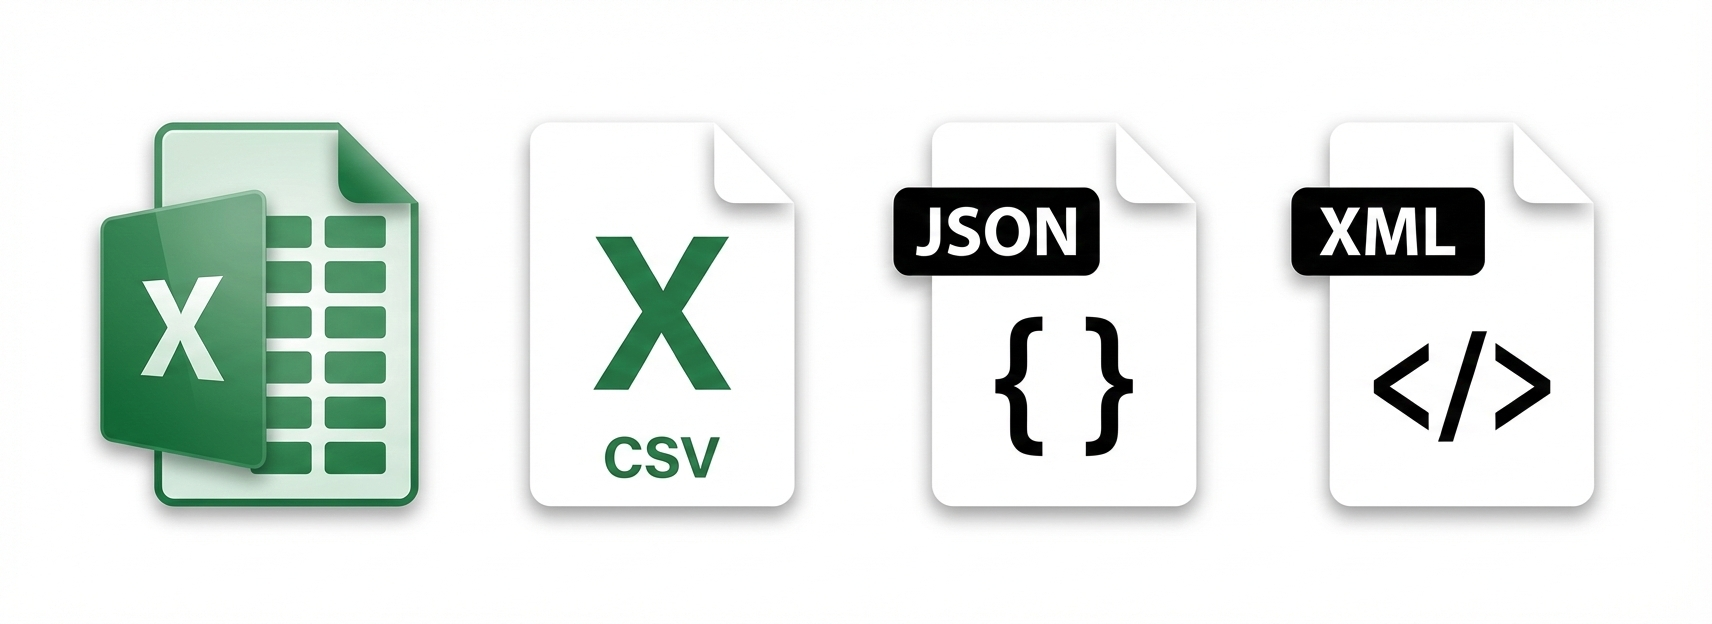
Obtaining Extracted Data
Download results (CSV/Excel/JSON/TXT) or retrieve them programmatically. Choose per-document or bulk, and wire in webhooks or API pulls.
Explore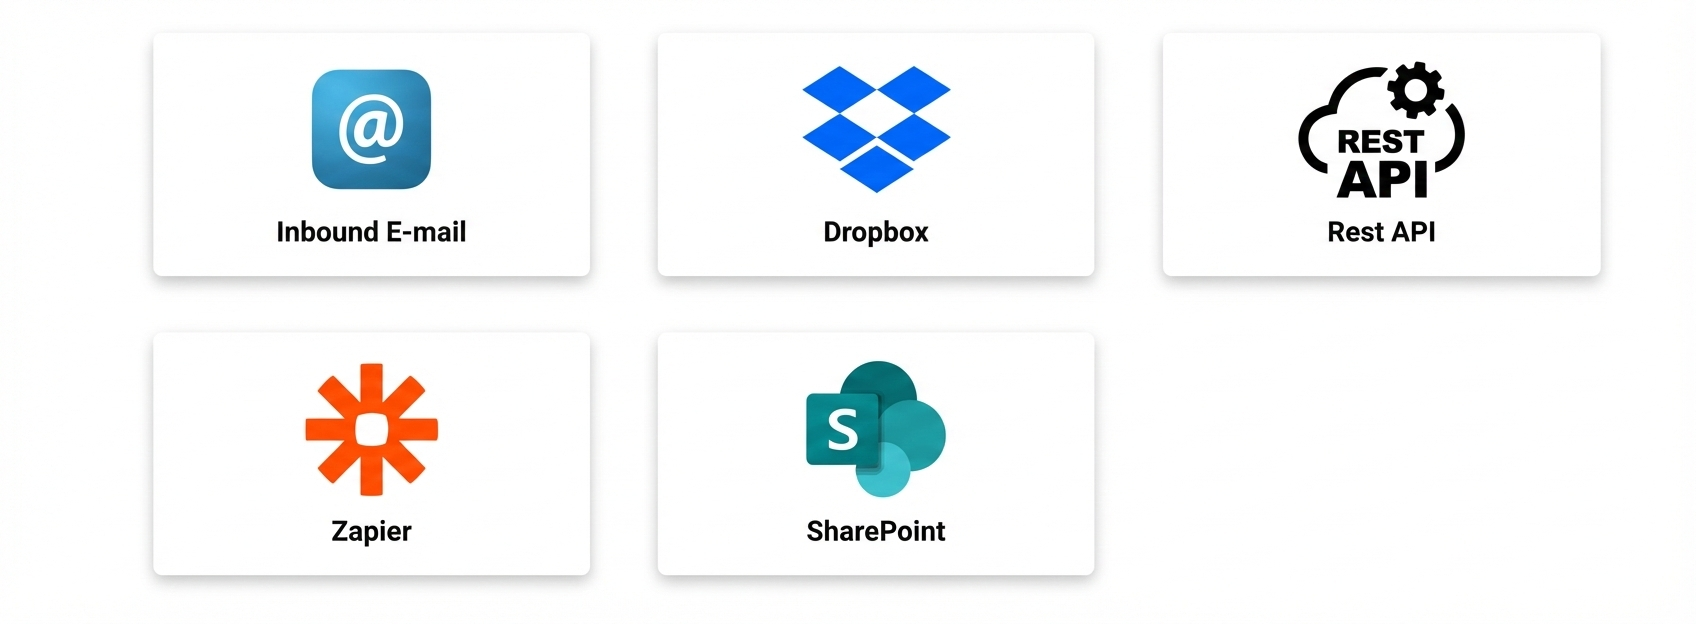
Integrations
Connect email, Google Drive, Dropbox, Zapier, and API to automate intake and delivery—no manual steps required.
Explore
Accounting & Billing
Manage plans, invoices, payment methods, and usage. Understand page quotas and how processing maps to billing.
Explore
Account Setting
Reset passwords, add users, set retention, and configure timezone/date display so UI timestamps match your locale.
ExploreImporting Documents
Bring files into Algodocs via manual upload, email, or cloud connectors. Route to folders, auto-assign extractors, and kick off processing instantly.
Start hereOverview
Bring documents into Algodocs via Manual Upload, Email, Google Drive, Dropbox, Zapier, or the REST API. This page unifies steps, supported formats, practical limits, folder behavior, and guidance for combined PDFs.
At a glance
- Multiple import channels with extractor selection per flow
- PDFs & common image types supported
- No strict hard cap on pages/file size (practical limits may apply)
- Folders are organizational (no special processing semantics)
Quick access
Import Methods
Pick the method that fits your workflow. Select a destination folder and an Extractor.
Uploading Documents
After logging into your account, click on Documents from the left menu. On the page that opens, click Upload Files. Next, choose the extractor you want to process these documents with by clicking the Select button next to "Upload files for extractor," and then proceed to upload your files.
Tips
If you prefer to organize your documents into a specific folder, you can create one by clicking the New Folder button in the top right corner of the Documents page. Once you create and open your new folder, clicking the Upload Files button from within will upload your documents directly into that specific folder.
Filters
- Type: Sender is / Subject contains / Body contains
- Value: multiple values via
|separator - Save in: destination folder in Algodocs
- Extractor: applied to matching attachments
Why use it
Great for invoices/POs arriving by email — no manual steps once filters are set.
Attachments that match your filters ingest automatically.
Setup
- Connect Google Drive in Integrations
- Select Drive folder(s) to watch
- Pick destination folder + Extractor in Algodocs
- Save the integration
Notes
Cleanup: Source files in the watched folder may be removed post-import to prevent duplicates. Use a dedicated “Drop-in” folder.
Polling occurs periodically (e.g., every few minutes).
Setup
- Connect Dropbox in Integrations
- Choose the Dropbox folder to monitor
- Select destination folder + Extractor
Good practice
Use a dedicated ingest folder and keep originals in an archive if needed.
Steps
- In Zapier → My Apps → connect Algodocs
- Create a Zap: choose a Trigger app (source of files)
- Add Algodocs action → send file/URL to folder + Extractor
Why use it
No-code pipelines from 2,000+ apps (email, storage, back-office, etc.).
Supported File Formats
PDFs (generated, scanned, mixed) and common image formats.
- Text-based PDFs (digital)
- Scanned PDFs (image-only)
- Mixed PDFs (text + image)
Images
- PNG
- JPG / JPEG
- TIFF
Document Size & Page Limits
General
- No strict app-level cap on pages or file size
- Very large single uploads may hit browser/network limits
- Prefer chunking via integrations/API for mega loads
Throughput Tips
- Compress scans (300 DPI, grayscale where possible)
- Batch by vendor/date for clean analytics
- Automate with Drive/Dropbox/Zapier/API
Folders in Algodocs
Folders help organize and route imports; they don’t change extraction behavior.
Best Practices
- One folder per document type or vendor
- Mirror finance/ops taxonomy (AP, AR, Statements)
- Attach import flows (email rules/storage) per folder
Access
- Use folder-level permissions if needed
- Set default extractor per flow
Do I Need to Split a Combined PDF?
Keep combined when…
- All pages are one case/transaction/vendor
- You want one output payload per file
- Extractor handles page variety well
Split when…
- Pages mix vendors or document types
- You need one record per invoice/packet
- Single file risks timeout → batch it
If bulk PDFs are common, add a pre-step to segment by vendor/reference for cleaner downstreams.
API
HelpFAQ
My upload is huge. Should I compress?
Yes — prefer 300 DPI, grayscale if acceptable, and lossless compression. Split mega batches or use API/integrations.
Route different vendors to different extractors?
Yes — use separate folders and attach the right email/storage/Zap flow to each.
Will files remain in my Drive/Dropbox?
Some flows clean up the source folder post-import. Keep originals in an archive or route copies to an “inbox” folder.
Can I monitor ingestion?
Yes — review integration logs and document statuses; add alerts via Zapier or your ops tools.
Extracting Rules
Create rules for text, numbers, dates, and tables. Use filters, regex, and keyword logic for high-accuracy capture.
What is an Extractor?
An extractor is a core feature in Algodocs that consists of a set of rules (extracting rules) that are used to extract data from documents. So, your entire data extraction lifecycle can start by firstly creating an extractor.
In general, you should create an extractor for every document that has a different layout. So, in other words you should create different extracting rules for documents with different layouts. However, in cases that your documents have similar layouts, then there are ways of creating only one extractor with more flexible extracting rules. You can find more information on creating different extractors with various extracting rules in other articles under the Extracting Rules category.
What do PDF Parser / OCR options in Extracting Rules mean?
Algodocs allows you to select the type of an engine in every extractor to apply when extracting data from a document. There are three options available:
- Both (when PDF Parser fails, then apply OCR)
- PDF Parser only
- OCR only
The first option is the default one, which means that Algodocs will try to apply PDF Parser and if it fails extracting data from a document, then it will automatically apply OCR (Optical Character Recognition). Therefore, there are only two types of engines that you actually apply for extracting data from documents.
What each of these engines mean and how to know which one to use?
PDF Parser engine is used for generated PDF files only, such that PDF files that contain text and not scanned files. So, PDF Parser works only for non-scanned PDF files with text only. However, OCR engine is applicable for both text PDF files and scanned PDF files along with images. In other words, while PDF Parser works for text PDF files only, OCR can be applied for all types of documents, text & scanned PDF files and images.
Then, we ask another question: why do I need PDF Parser engine at all, if OCR handles all types of documents?
The reason behind Algodocs still having PDF Parser engine is because of its speed performance. PDF Parser engine is much faster than OCR engine. PDF Parser can extract data from a single page in 1–2 seconds, whereas OCR will extract data from a single page in 10–15 seconds. Therefore, we advise you to prefer PDF Parser in cases when you have PDF files with text only.
Please, note that when you have a mixture of text and image in PDF files, then when applying PDF Parser Algodocs will extract only the text sections of your document by ignoring the scanned section of the document. Therefore, to make an extraction from scanned section too, you should select ‘OCR only’ option.
If you have troubles extracting data from your documents, please contact our support team.
Creating an Extractor
After logging into your account, click on the Extractors page from the left menu, then click the Create button in the top right corner.
In the window that opens, you can choose a Prebuilt Extractor based on your needs (these are templates that might fully cover your requirements; if so, you can further customize the created extractor). Alternatively, you can click on Custom Extractor, give your extractor a name, click the Choose File button, and select the document you want to use to build your extractor.
At this stage, your uploaded document will be processed to extract raw data. To transform this raw data into your desired output format, go back to the Extractors page. Find the extractor you want to work on, click the three-dot button under the Action column, and select Manage from the dropdown menu.
Next, click the Add button located under the Fields & Tables section at the top left of the page. Here, you can select the data extraction method that best suits your needs. The right method depends heavily on the structure of your document.
- Filter-Based Data Extraction: If your document is system-generated and always follows the exact same format, this method is a highly suitable solution. However, applying these filters can sometimes be challenging for our new users. If you encounter difficulties, you can request us to create your first extractor for free, or you can opt for one of our AI-Based Data Extraction methods.
- Generative AI Prompt Extraction: With this method, you can extract your desired data simply by writing natural language prompts.
- Custom AI Model Extraction: This method allows you to upload your documents, manually label the specific data points you want to extract, and train our model exclusively for your own document types to get the exact output you need.
- Key-Value Pairs Extraction: This method automatically captures key terms and their corresponding values from the document (such as Address, Date, Invoice No, Customer ID, Total). You can then use filters to select exactly which ones you want to extract.
- Smart Table Extraction: This method automatically detects and extracts tables from your uploaded document. You can then apply rules to specify which tables or columns you actually need.
You are not limited to choosing just one method. You can combine Filter-Based Data Extraction and AI-Based Data Extraction methods within the same extractor as you see fit. Once you configure your extractor, any documents you upload in the future will be processed according to these rules, returning your data in the exact output format you designed.
Need help? If you prefer not to build the extractor yourself, you can submit a request here, and we will create your first extractor for you completely free of charge.
How to create an extracting rule
We did our best to keep creation of extracting rules in Algodocs as simple as possible. In general, steps for creating an extracting rule are as follows:
- Click on ‘Add Rule’ button
- Select the data type field (Text, Number, Date, etc.)
- (optional step) Select an area of the data you want to extract (do this only if your data is always in a fixed position, i.e. it will not change its position when you upload other documents later)
- Click on ‘Extract’ button
- Use default filters or add new filters by using ‘Add Filter’ to refine your data until you get the desired output
Watch the introductory tutorial video to get started with creating extracting rules. (Video)
How to extract text from a document
Text extraction from documents is one of the most common extracting rules used in Algodocs. It is even advised to use text instead of a number for Invoice Number or Account Number fields. The reason behind this is that invoice or account numbers sometimes include letters, in which case a number data type will fail. Although text related extracting rules are widely used, it is very easy to create them in Algodocs.
In order to create an extracting rule for text data type we first click on ‘Add Rule’ and then select ‘Text’ from the list of data types. The next step is to decide whether the data that we want to extract is always at the fixed position. If this is the case, then we can simply select an area around the data we want to extract by drawing a rectangle around it. If the data might change its position in your documents later, then skip selecting an area and move on by clicking on ‘Extract’ button.
When we get extracted data from the document we can refine data further until we get the desired output in the required format. Therefore, we can add various filters to the extracted text by using ‘Add Filter’. For example, if the extracted text consists of several lines and you wish it to look properly by making it a single line, then click on ‘Add Filter’ › ‘Format Text’ › ‘Remove line breaks’. Moreover, one of the most common issues with text data extraction is the multiple spaces problem.
Often our users need to remove multiple spaces between extracted words. In order to overcome this problem click in ‘Add Filter’ › ‘Format Text’ › ‘Remove blank spaces’ and then select ‘Multiple Blank Spaces’ option from the dropdown list.
Watch the video tutorial that covers most of the scenarios related to text data extraction. (Video)
Fixed vs variable position extraction
Data extraction from a fixed position in Algodocs is performed by selecting an area around the data you need to extract. So, you simply draw a rectangle around the data. (Image)
Keep in mind that extracting data by selecting an area should be done only in cases when the data you want to extract is always in a fixed position. Therefore, if there are possibilities that your data will move and change its position, then you should not apply selection of an area, because when it changes its position your data will not be extracted as it will fall outside the area you selected.
On the other hand, for data extraction from a variable position we do not select an area. However, there are several ways we can apply. One of the ways is to extract everything from the document and apply filter to refine the data we need. This is possible by using such filters as ‘Specify Start Position’ and ‘Specify End Position’. Using these filters you can easily capture the data you need even from a variable positions, since you can use keywords/labels to search for.
With ‘Specify Start Position’ you can use ‘Text match after’ option for which you enter at least one keyword. However, if you need to specify several keywords you may do so by separating them with a vertical bar ‘|’. Similarly, with ‘Specify End Position’ you can use ‘End of line’ for example, which will capture everything until the end of that line.
Another way of extracting data from a variable position is using ‘Keyword Based Search’ from the list of ‘Data Extraction Field Types’. In this case you will need to specify all possible keywords to which your data is related.
Please contact our support team in case you have difficulties in setting up an extracting rule for extracting data from a variable position.
How to extract numerical data (amounts, totals, etc.)
Extracting numerical data is just as extracting text or other data except that you select a ‘Number’ as the data field type. However, keep in mind that if you already selected let’s say ‘Text’ as the data field type and progressed with extracting rule by adding filters, then you can also apply a number filter by clicking on ‘Add Filter’ › ‘Find …’ › ‘Find numbers’.
‘Find numbers’ filter searches for valid numbers in the document and outputs only found valid numbers.
The following are sample valid numbers:
- 1,456.00
- 5555
- $ 2,546.00
The following are sample invalid numbers and will not be captured by ‘Find numbers’ filter:
- 4564-231-2121
- 18%
- 8/11/2020
‘Find numbers’ filter offers a culture for number formats. Moreover, you can search for integers only, floating numbers only or all. Sometimes you might need to specify the range, so you can specify a range so that numbers are searched only in the specified range. Moreover, you can apply ‘Format numbers’ which, for example, removes currency symbols, etc. (Image)
How to extract dates in different formats
Usually extracting dates from documents begins by selecting a ‘Date’ as the data field type or applying a ‘Find dates’ filter by clicking on ‘Add Filter’ › ‘Find …’ › ‘Find dates’.
‘Find dates’ filter searches for valid dates in the document based on the format you specify in ‘Format on document’ field. (Image)
You can change the output format of dates by specifying the format in ‘Output format’ field. (Image)
The following table contains detailed information on the date format syntax used in Algodocs.
Day Formatting Syntax
d — Day of the month without leading zeros (1 to 31)
dd — Day of the month, 2 digits with leading zeros (01 to 31)
s — English ordinal suffix for the day of the month, 2 characters (st, nd, rd or th). Works well with ‘d’
Month Formatting Syntax
M — Numeric representation of a month, without leading zeros (1 through 12)
MM — Numeric representation of a month, with leading zeros (01 through 12)
MMM — A short textual representation of a month, three letters (Jan through Dec)
MMMM — A full textual representation of a month (January through December)
Year Formatting Syntax
yyyy — A full numeric representation of a year, 4 digits (e.g., 1991, 2014)
yy — A two digit representation of a year (e.g., 14, 19)
Examples
MM/dd/yyyy → 01/24/2021
M/d/yyyy → 1/24/2021
yyyy-MM-dd → 2021-01-24
MMMM d, yyyy → January 24, 2021
ds MMMM yyyy → 24th January 2021
MMM-dd-yy → Jan-24-21
How to extract table rows
Table rows data extraction is the most widely used data extraction type in Algodocs. Algodocs offers very flexible tabular data extraction without limiting the number of rows, columns or number of pages when table spans over hundreds or thousands of pages.
In order to create an extracting rule for table rows select ‘Table’ as the data field type. You will see that several default column splitters will be placed over your document. You may remove or add more splitters based on your table’s number of columns by clicking on the ‘+’ button on the left side of your document.
As an optional step, you can select an area of your table by drawing a rectangle around the table you want to extract rows from. (Image)
Please note that selecting an area for the table is fine only in cases when your table is at the fixed position and will never get longer by spanning over multiple pages. So, if there is possibility that your table may span over multiple pages or even if your table never spans over multiple pages, but can move up or down within the same page, then just don’t select an area for it.
After clicking on ‘Extract’ button the extracted data is displayed. In order to remove column headers that were also extracted, we apply ‘Keep Rows’ filter with a condition ‘Where column 2 has digits only’. (Image)
As a final step we can set the column headers of our extracted table by clicking ‘Add Filter’ › ‘Alter Columns’ › ‘Set Column Headers’. (Image)
Extract table rows without selecting an area
We have discussed table rows extraction in detail in the previous article. In this article we talk about extracting table rows using a more advanced approach, i.e. without selecting an area of the table by drawing a rectangle around it.
This time Algodocs will extract all data from the document and place it into the columns table. In order to get only the line items we need to specify the beginning and the end of our table. For this, we apply ‘Add Filter’ › ‘Alter Rows’ › ‘Keep Section’ and in ‘Keep Section’ select ‘With Condition’ to specify the start and end of the table section.
When we look at our data we see that our actual line items begin after the word ‘DESCRIPTION’ in column 1 and end just before the word ‘Subtotal’ in column 3. (Images)
As a final step we can set the column headers of our extracted table by clicking ‘Add Filter’ › ‘Alter Columns’ › ‘Set Column Headers’. (Image)
Extract table rows when cells have multiple lines (merge rows)
AlgoDocs was designed to handle data extraction from tables of any complexities. One such complex situation is cells having multiple lines. These multiple lines in a cell are actually a single row. Therefore, Algodocs offers a ‘Merge Rows’ filter for such cases.
First, place column splitters and click ‘Extract’. Algodocs will extract the data and turn it into a table. Then define the beginning and the end of the table rows you want to extract by applying ‘Keep Section’ (Alter Rows › Keep Section) with ‘With Condition’.
Next step is to merge the rows and have all rows begin with the date in the first column. Apply ‘Merge Rows’ (Alter Rows › Merge Rows). Inside this filter use a condition such as ‘Where column 1 has a value’. The final table will have merged rows. Other approaches (including RegEx patterns) can also be used. (Images)
Optionally set column headers via ‘Alter Columns’ › ‘Set Column Headers’.
How to extract email addresses
Extracting email addresses is most probably the easiest filter that you can use in AlgoDocs. Select ‘Email Address’ as the data field type. You can also add a filter at any time by clicking on ‘Add Filter’ › ‘Find …’ › ‘Find email addresses’.
‘Find email addresses’ searches for valid email addresses. (Image)
How to extract data based on keywords
Most of the time the data we need to extract has their own keywords/labels that identify the data. For example, Account Number, Invoice #, ID, Statement Date, Purchase Order ID, Vendor, Page, etc. Therefore, Algodocs has flexible and easy-to-use approaches for keyword-based extraction.
There are two keyword-based data extraction approaches in Algodocs:
- Text match [before | after | including] filters
- Advanced keyword-based search
Using Text match filters: Often used when keywords are positioned inline to the left of the data to extract (e.g., Phone, INVOICE #). Use ‘Specify Start Position’ with ‘Text match after’ to enter keywords, and ‘Specify End Position’ with ‘Text match before’ for stopping criteria. Remove trailing spaces if needed (Format Text › Remove blank spaces › Trailing Blank Spaces). (Images)
Advanced Keyword-Based Search: Lets you define a set of keywords or phrases, not limited to inline layouts. Useful when keywords are above the values or in complex layouts. Select ‘Advanced Keyword-Based Search’ as the field type (or Add Filter › Advanced Keyword-Based Search), then define keywords via ‘Edit Keywords’. The engine searches for keywords in order, then looks to the right/bottom areas for their values. (Images)
Data extraction for dates, amounts and other fields are implemented similarly. Contact support for help as needed.
How to extract data using Regex (regular expression)
Data extraction using RegEx is widely used in Algodocs; in some complex or special cases it gives full flexibility. To create a rule that uses RegEx, select ‘Regular Expression’ as the data field type. Another way is via ‘Add Filter’ › ‘Find …’ › ‘Find by Regex’.
Example: Find all dates in a document with ‘M/d/yyyy’ format using the pattern \d{1,2}/\d{1,2}/\d{4}. Check ‘Global’ to return all matches. (Image)
You may visit regex101.com for more information on regular expressions.
How to search and replace extracted data
When you need to replace extracted data, use the ‘Search & Replace’ filter in Algodocs. Click ‘Add Filter’ › ‘Search & Replace’ and select either ‘Search By Text’ or ‘Search By RegEx’.
With ‘Search By Text’ enter the plain text to replace and the replacement value. With ‘Search By RegEx’ enter a regular expression for the search field instead of plain text. (Image)
What does Reprocess mean?
There are cases when you might need to tweak your extracting rules after uploading a bunch of documents. Since Algodocs extracts data based on your extracting rules immediately after upload is complete, all documents will be processed and data extracted automatically. However, you might wish to get those documents processed again based on your updated (tweaked) extracting rules.
To apply extraction again, go to the ‘Extracted Data’ section and click ‘Reprocess’. Before reprocessing you might filter documents by folder or upload dates, then click ‘Reprocess’ to queue documents for extraction based on the latest rules.
Note: Reprocessing does not use extra quota. You can reprocess as many times as you need. Your quota is deducted only once per processed page.
Processing time per page
Algodocs has two engines for extracting data from documents — PDF Parser and OCR.
- PDF Parser average processing time: 2 seconds per single page
- OCR average processing time: 20 seconds per single page or image
How to delete an extractor
Extractors in Algodocs are the basis for data extraction from documents. Before deleting an extractor, make sure all documents and extracted data associated with it are no longer needed. Go to the ‘Extractors’ section, find the extractor to delete, click the ‘Delete’ button, and confirm the warning. All documents along with extracted data associated with this extractor will be deleted. This operation cannot be undone.
How to delete an individual extracting rule
To delete an extracting rule, go to the extracting rules by clicking on ‘Extracting Rules’ of the relevant extractor. Hover over the rule you want to delete and click the ‘Delete’ button that appears, then confirm the warning.
Note: If you delete an extracting rule, extracted data related to it will not be available anymore. This operation cannot be undone.
How to duplicate an individual extracting rule
Duplicating extracting rules is useful when you need to create a complex rule and already have a similar one. Instead of rebuilding filters, duplicate the existing rule and tweak it.
Go to extracting rules via the relevant extractor, hover over the rule you want to duplicate, and click ‘Duplicate’. Enter a name for the new rule and specify the extractor where the copy will be created. (Video)
How to change a sample document used for creating extracting rules
When creating an extracting rule it is important to use the right sample document, since this document plays a vital role in creating accurate rules. Sometimes extracting rules might fail to extract properly from specific documents. In that case, use the specific “problematic” document as the sample to test and tweak your rules.
To change the sample document: go to extracting rules from the relevant extractor, click the rule you want to test, then at the bottom of the page click ‘Change Sample Document’. In the popup, choose one of the last 50 uploaded documents to use as the sample. (Video)
Obtaining Extracted Data
Download results (CSV/Excel/JSON/TXT/XML) or retrieve them programmatically. Choose per-document or bulk, and wire in webhooks or API pulls.
Start hereOverview
This page combines three help topics: exporting extracted data, using the API, and exporting via Zapier.
What you can export
- Manual files: Excel, CSV, TXT, JSON, XML
- Automations to Sheets/CRMs via Zapier
- Programmatic pulls via API
When to use which
- Manual: ad-hoc reports or small batches
- Zapier: continuous sync into tools (e.g., Google Sheets)
- API: full control & integration into apps/pipelines
Export options
Pick how you want your extracted data to flow out of Algodocs.
Export to file
After logging into your account, click on Extracted Data from the left menu.
On the page that opens, select the extractor whose output data you want to view. If you wish to view outputs for documents uploaded to a specific folder, select that folder. If you want to view outputs for all documents processed by the chosen extractor, you don't need to select a folder, as all folders are selected by default.
You can also filter and view outputs for a specific timeframe simply by selecting your desired date range.
On the right side of the same screen, you can export your extracted data in Excel, CSV, JSON, XML, or TXT formats.
If you would like to automate these steps, feel free to check out our integrations page. We offer a wide range of integration options, from APIs to webhooks, to help streamline and automate your workflow.
What you can do
- Import documents from files or URLs
- Pull extracted data for single or multiple documents
Authenticate (e.g., OAuth 2.0) and call the endpoints documented below.
When to use the API
- You need real-time or bulk programmatic access
- Orchestration inside your app/ETL
- Custom export formats/destinations
Why Zapier
Create “Zaps” that move extracted data to apps like Google Sheets, CRMs, ERPs—no code.
- Connect Algodocs in Zapier → My Apps
- Create a Zap: Trigger = Algodocs “Extracted Data Available”
- Add an Action in the target app (e.g., “Create Spreadsheet Row”)
Use a dedicated sheet with matching columns to map fields cleanly.
Popular flows
- Append extracted rows to Google Sheets
- Email results via Gmail
- Push to databases, CRMs, ERPs, or webhooks
Common questions
Can I export multiple formats?
Yes — export to Excel, JSON, or XML from the Extracted Data page. For scheduled/ongoing exports, use Zapier or the API.
How do I get API credentials?
Open the API Reference to review authentication and endpoint setup.
How do I start with Zapier?
In Zapier, go to My Apps → connect Algodocs → create a Zap with Algodocs as the trigger, then map fields to your target app (e.g., Google Sheets).
How to Export Extracted Data to a Custom Excel Template?
This feature allows you to export your extracted data into your own Excel template format. You can upload a custom Excel file and automatically map extracted data into your preferred layout.
Step 1: Go to the Extractors page and select the extractor you want to export data from.
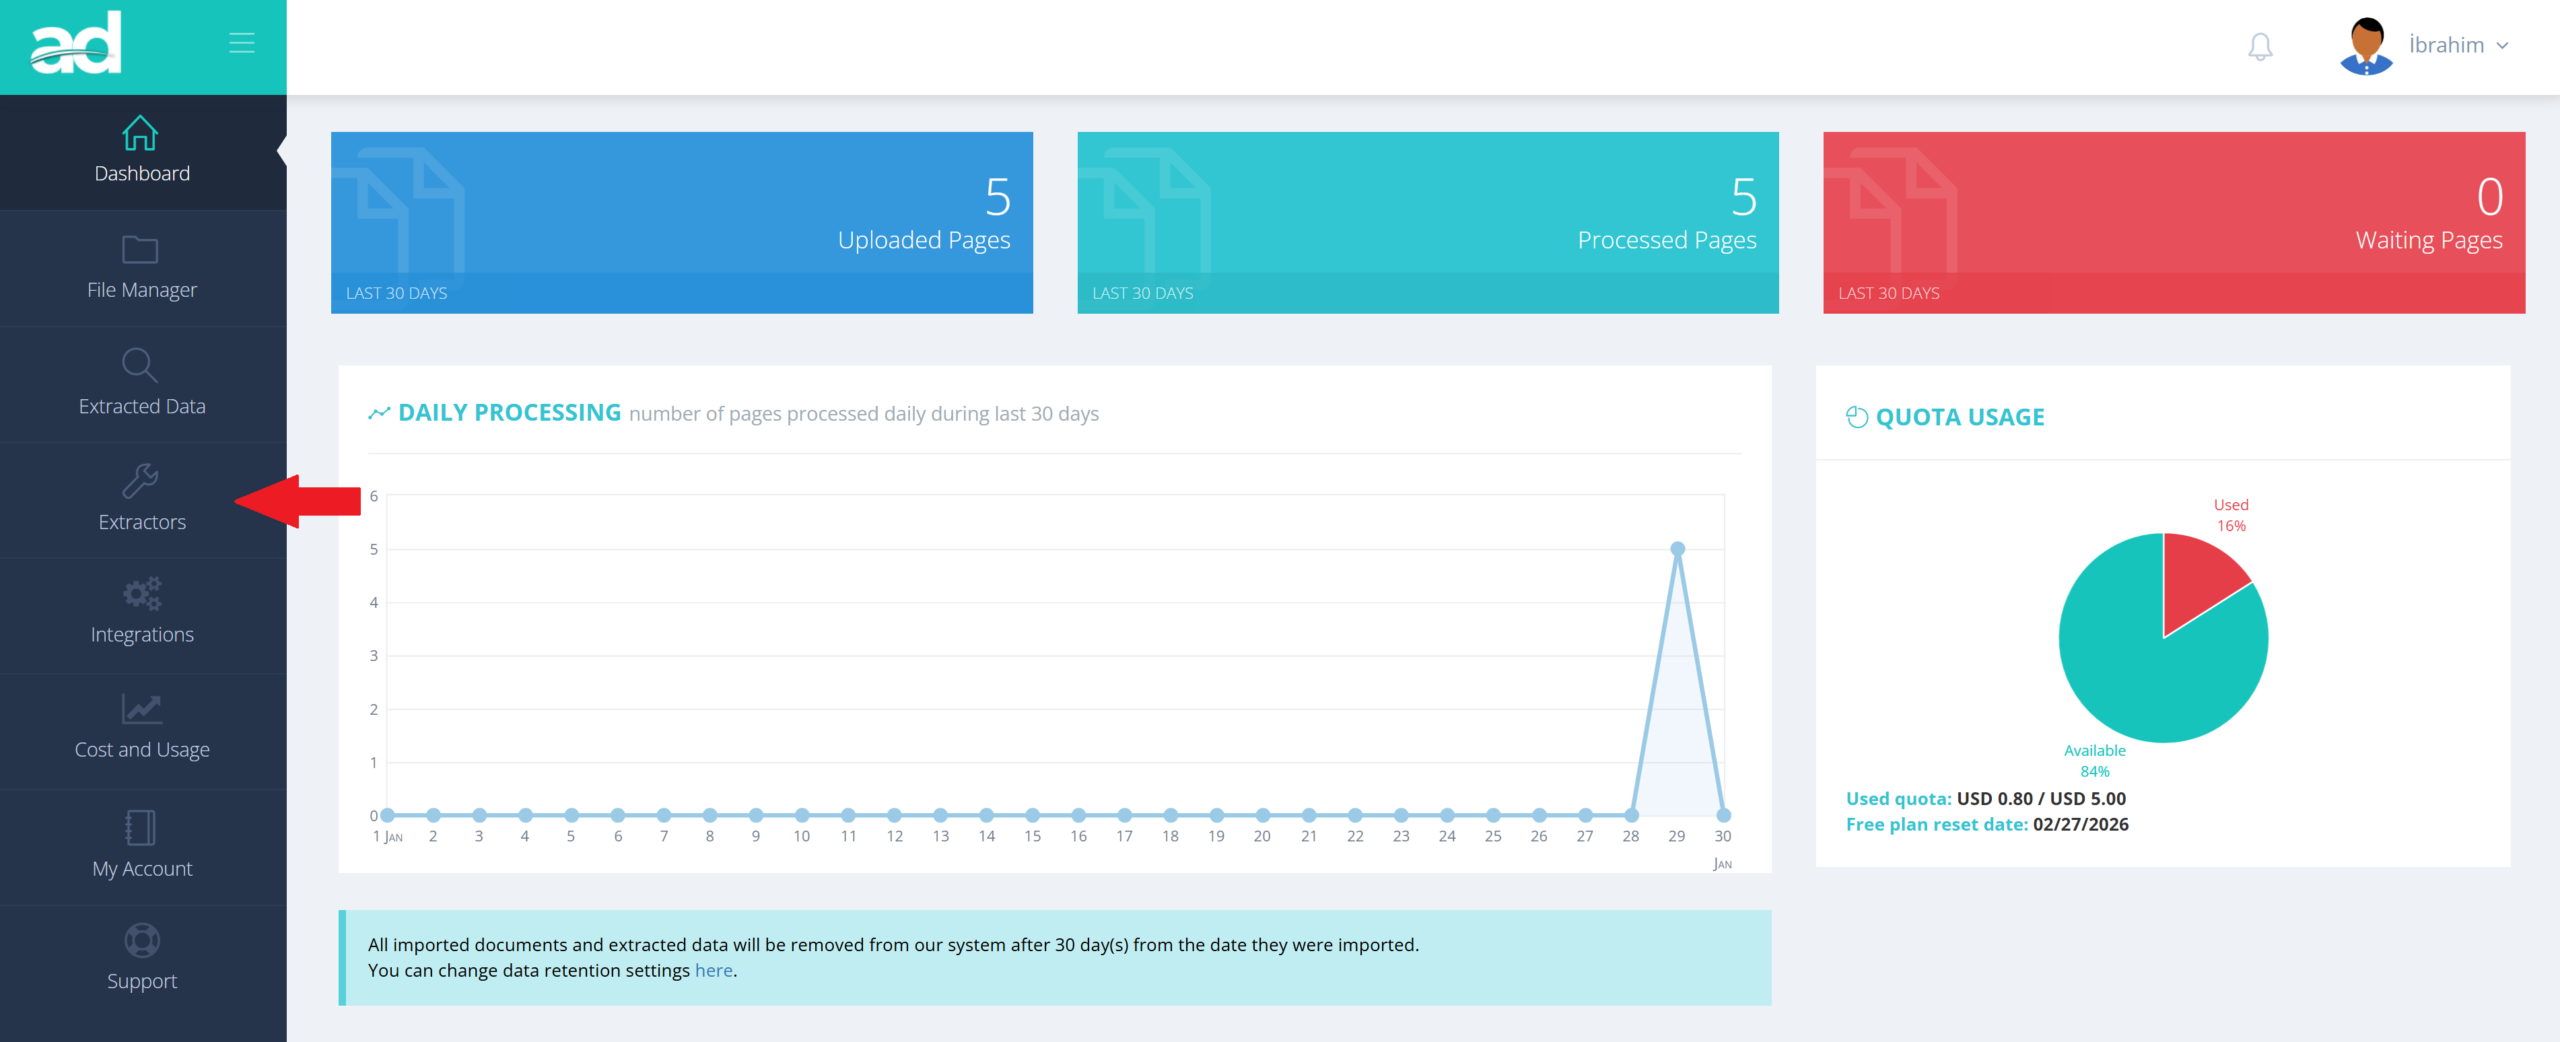
Step 2: Go to the Extractors page and select the extractor you want to export data from.
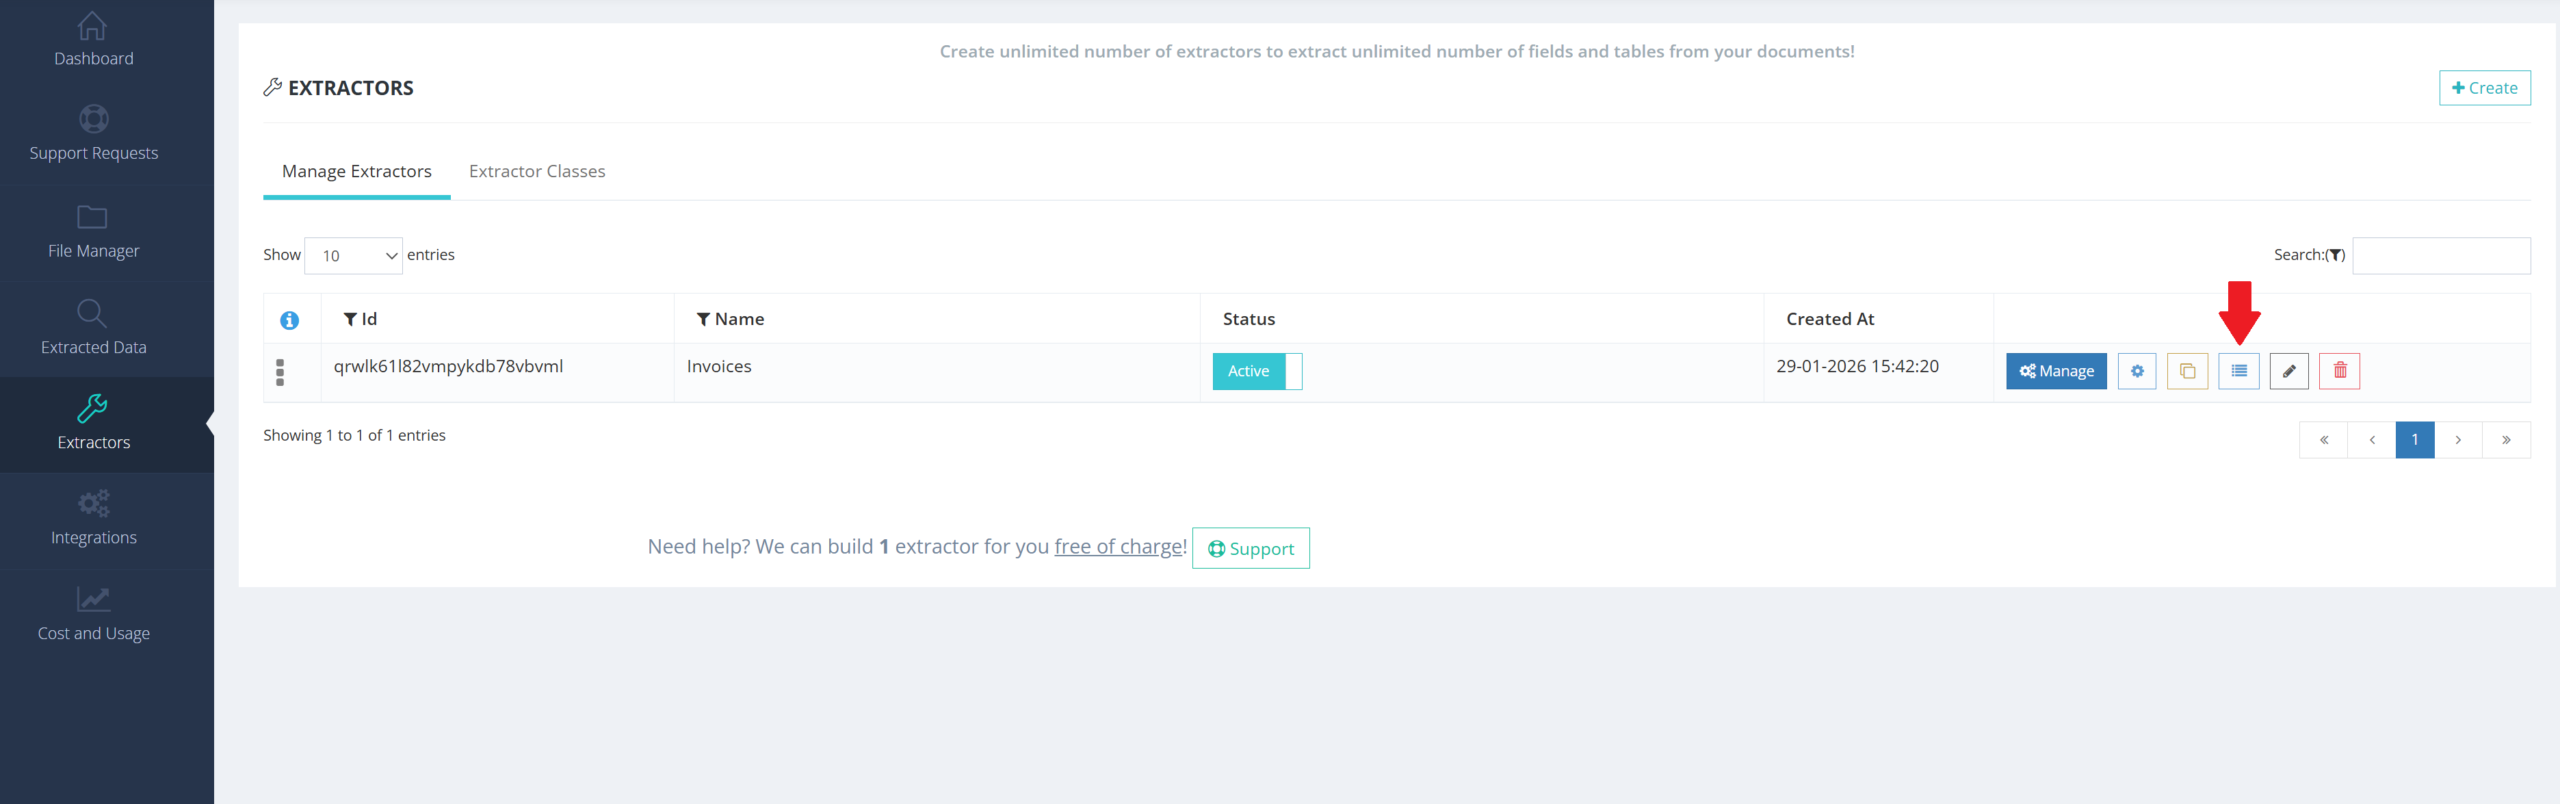
Step 3: Go to the Extractors page and select the extractor you want to export data from.
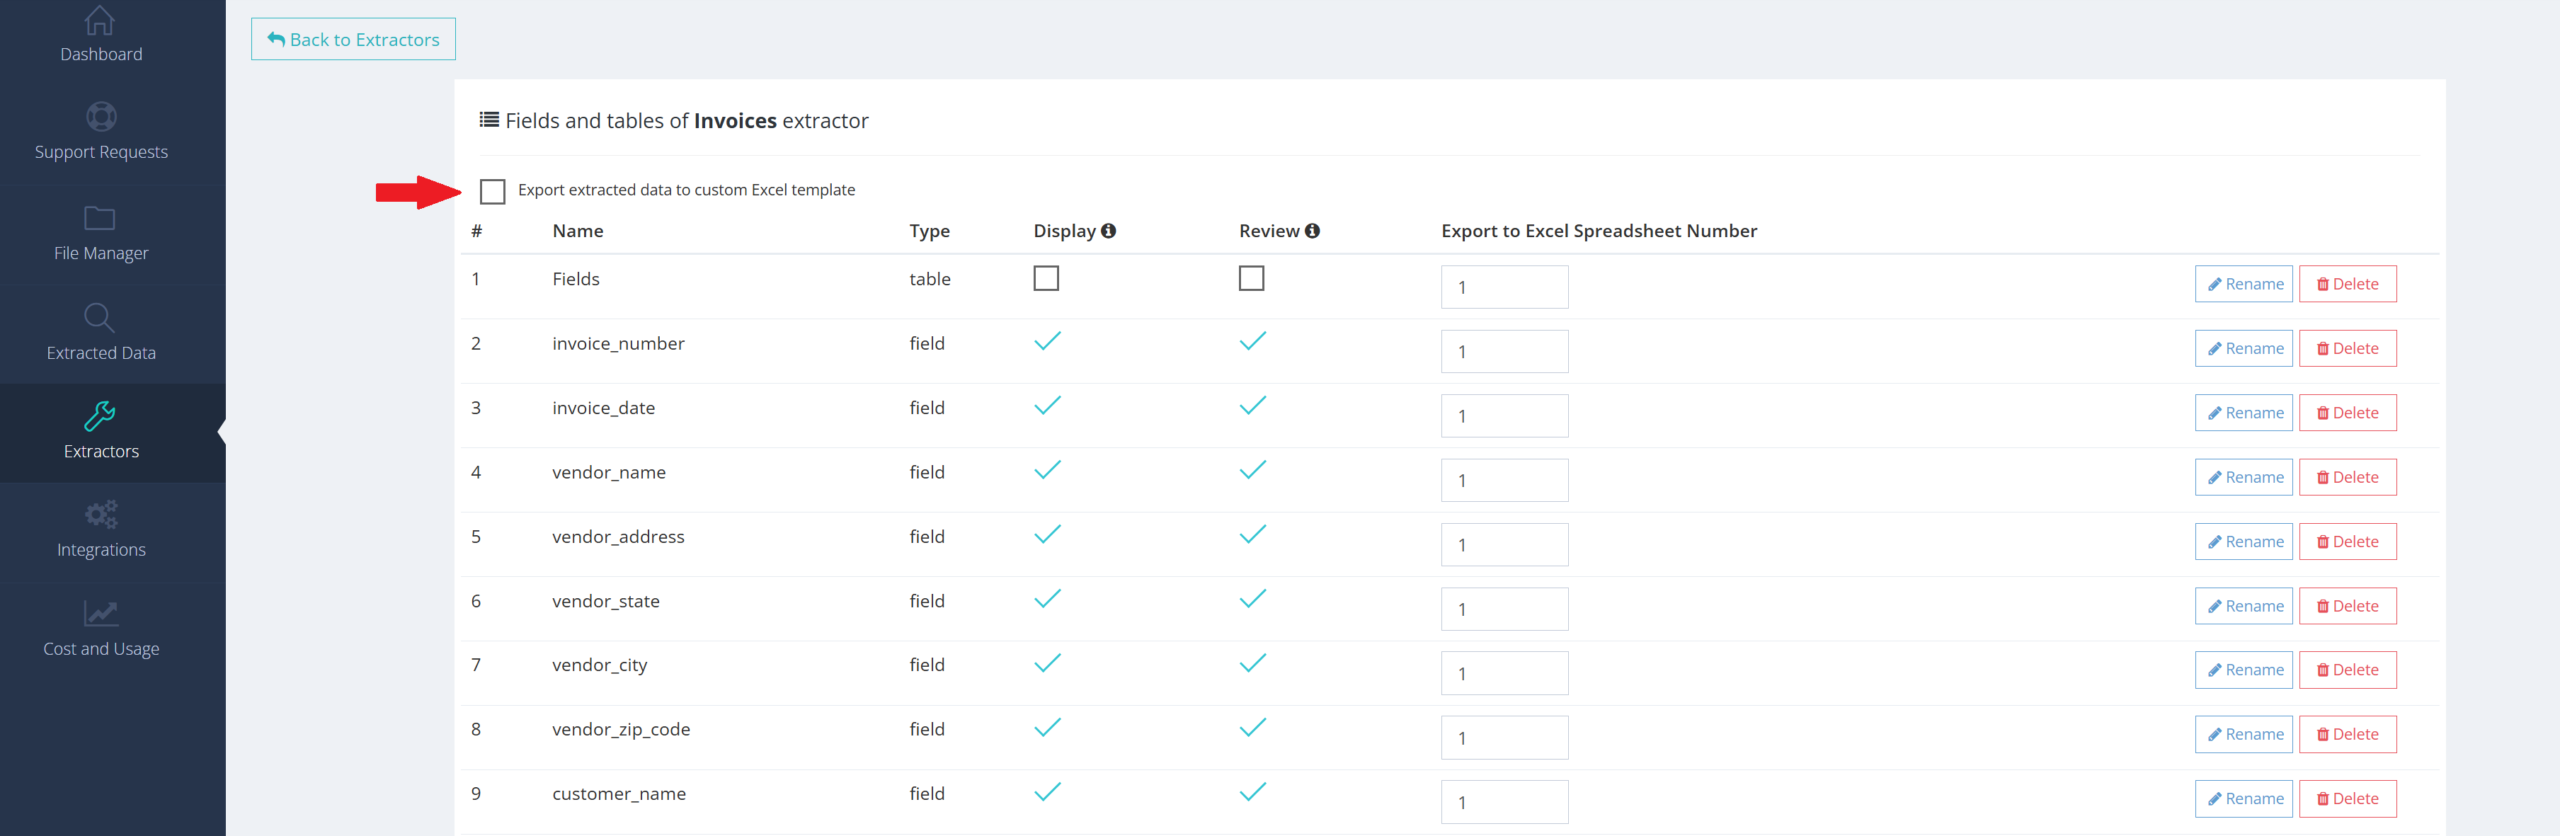
Step 4: Go to the Extractors page and select the extractor you want to export data from.
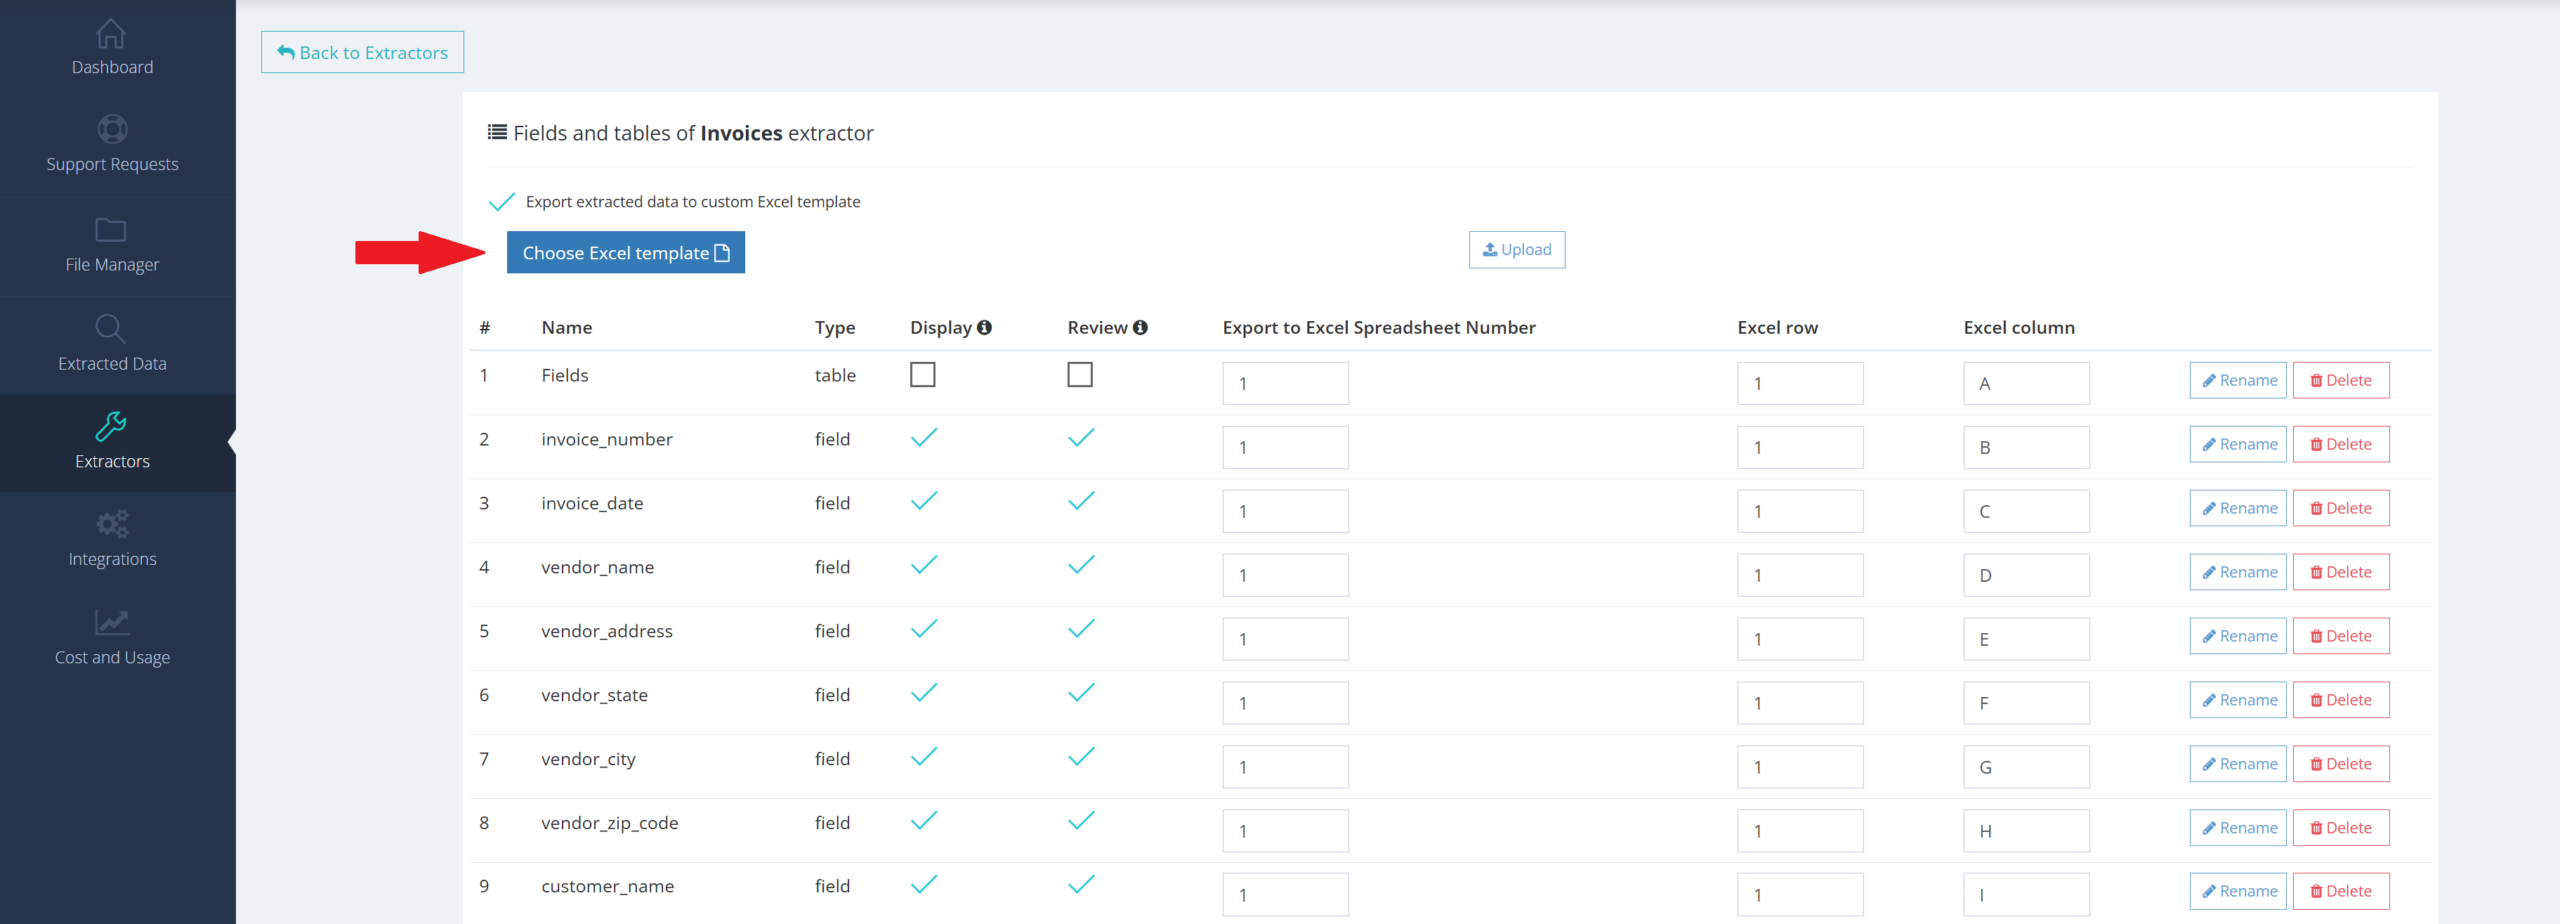
Step 5: Go to the Extractors page and select the extractor you want to export data from.
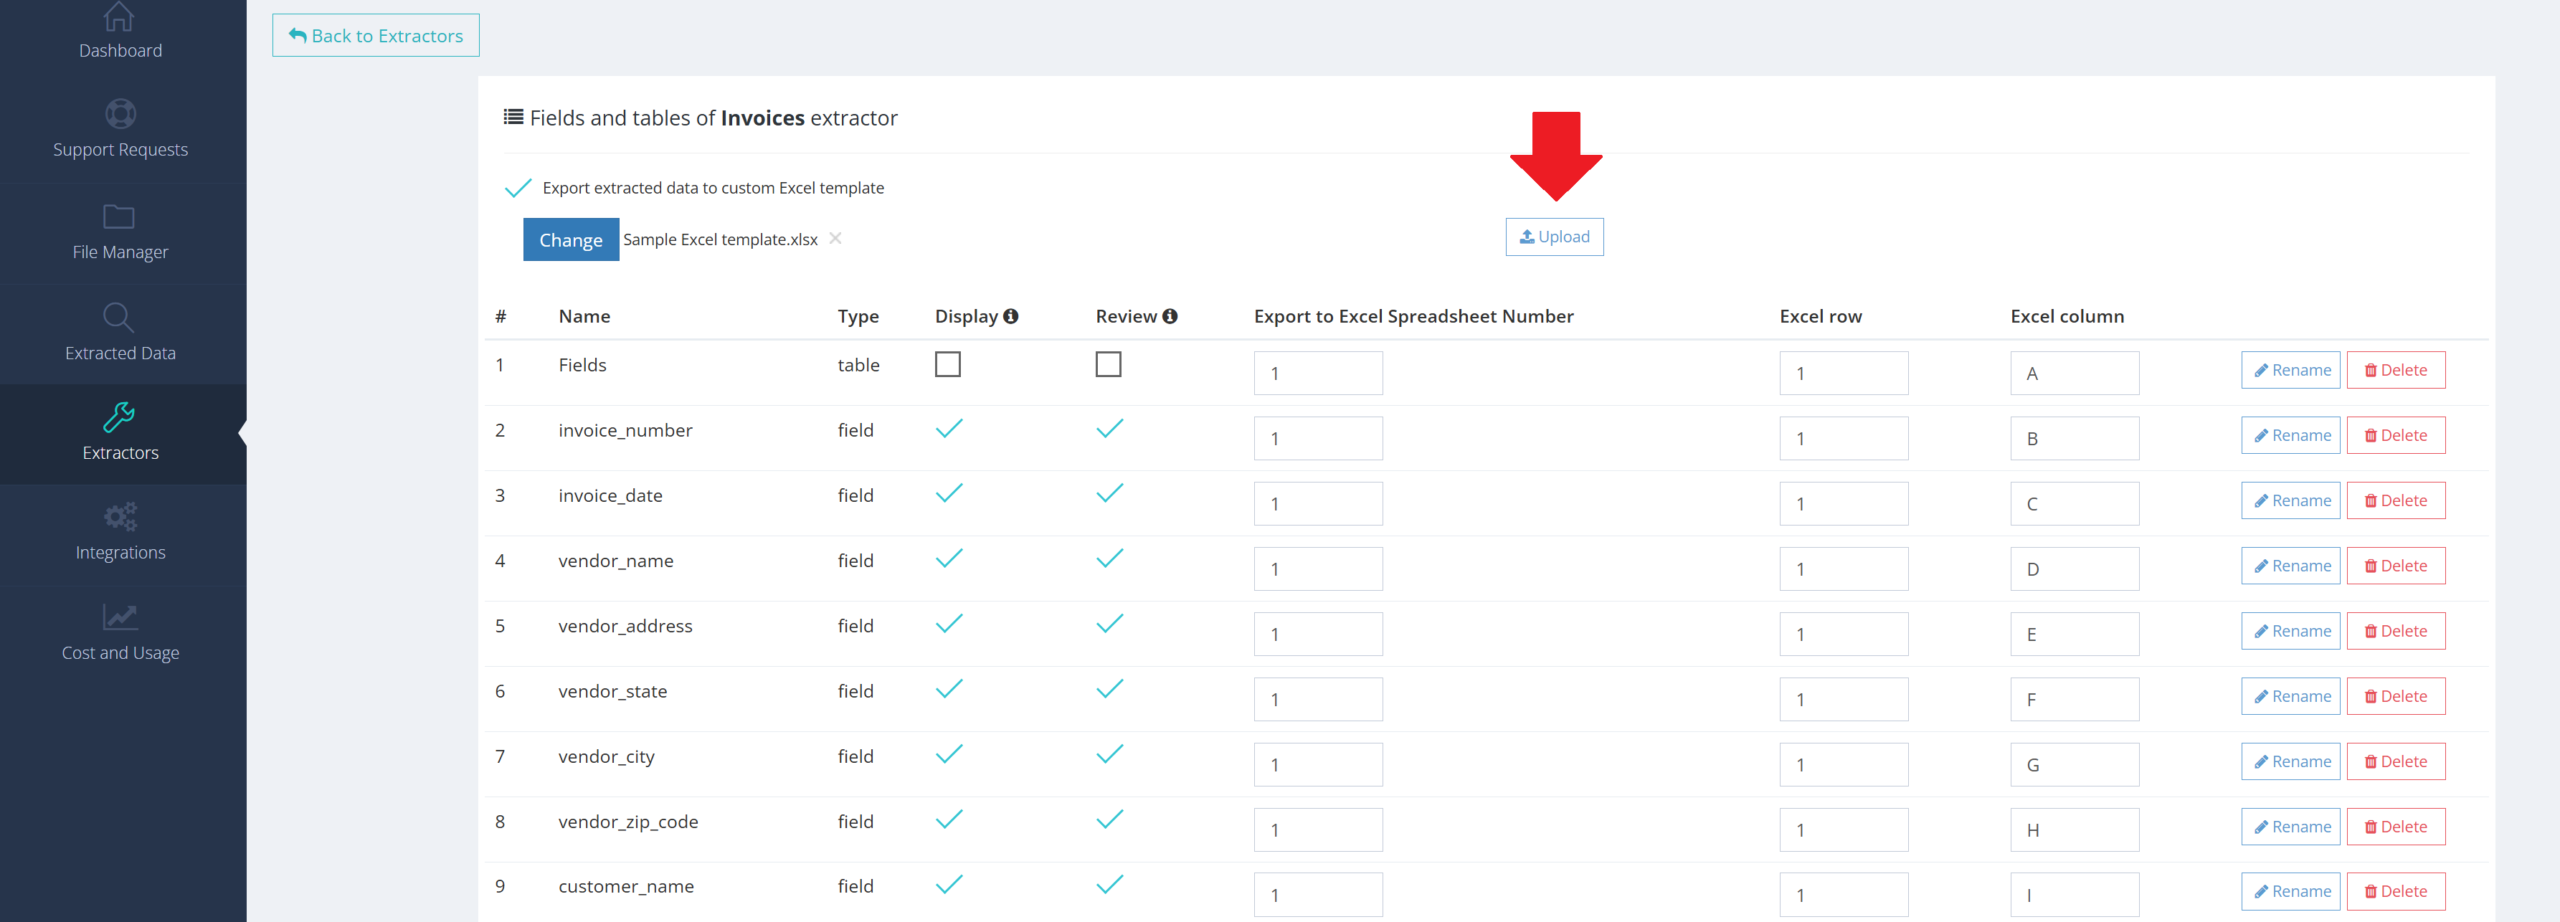
This feature allows you to export your extracted data into your own Excel template format. You can upload a custom Excel file and automatically map extracted data into your preferred layout.
Integrations
Connect email, Google Drive, Dropbox, Zapier, and API to automate intake and delivery—no manual steps required.
Connect Algodocs with your email, cloud storage, automation tools, and API.

Inbound E-Mail
With e-mail integration you can get your documents processed automatically via e-mail.
Read guide
Webhook
Webhooks allow you to send extracted data from your documents to the URL you provide.
Read guide
ViaSocket
Using viaSocket, you can automatically send documents from other apps to Algodocs for processing.
Read guide
FTP
FTP integration allows you to send extracted data to the FTP location you specify.
Read guide
Zapier
Zapier lets you connect Algodocs to 2,000+ other web services.
Read guide
Rest API
The AlgoDocs API v1 is a set of HTTP endpoints that help your app integrate with Algodocs.
Read guide
If you would like to read more about these or try making the first move toward improving your operations, do not hesitate to contact us today! Follow this link to schedule a demo and sign up.
Inbound E-mail Integration
How to Import Documents via Inbound Email
Follow these steps to set up an email integration that automatically imports and processes documents sent to a custom address.
Step 1: Access Inbound Email Settings
Log in to your account, navigate to the Integrations section in the side menu, and select Inbound Email.
Step 2: Configure Your Integration Rules
To ensure your documents are processed correctly, set up your parsing rules:
Filter Type: Choose how you want to filter incoming emails. You can filter by Sender Email, Subject, or Email Body.
Filter Value: Enter the specific criteria (e.g., the sender’s email address or a specific keyword in the subject line).
Saving Folder: Select the folder where the imported documents should be stored.
Extractor: Choose the extractor that will automatically process the data from these documents.
Step 3: Copy Your Custom Email Address
Once you save the integration, the system provides you with a customized email address. Copy this address. You can provide this to your vendors or set up an auto-forwarding rule from your own professional inbox.
Step 4: Send a Document
Go to your email client and compose a new message.
Paste your customized address into the “To” field.
Attach the document you wish to process and click Send.
Step 5: Verify the Extraction
Wait approximately 2 to 3 minutes for the system to receive and process the file. You can then:
Check the File Manager to see the document in your selected folder.
Visit the Extracted Data page to view and export the data captured from the email attachment.
If you would like to read more about these or try making the first move toward improving your operations, do not hesitate to contact us today! Follow this link to schedule a demo and sign up.
Receive Extracted Data Using Webhooks
Webhooks allow you to send extracted data from your documents to the URL you provide.
After your webhook is created extracted data will be sent to the specififed URL right after the extraction process is completed. You can activate/deactivate your webhook or alter it any time you need.
How to Set Up Webhooks in Algodocs
Follow these steps to automatically send your extracted data to a specific URL using Webhooks.
Step 1: Access Webhook Settings
Log in to your Algodocs account. From the main dashboard, navigate to the Integrations section in the side menu and select Webhooks.
Step 2: Create a New Webhook
Click on the “Create New Webhook” button. A configuration window will appear.
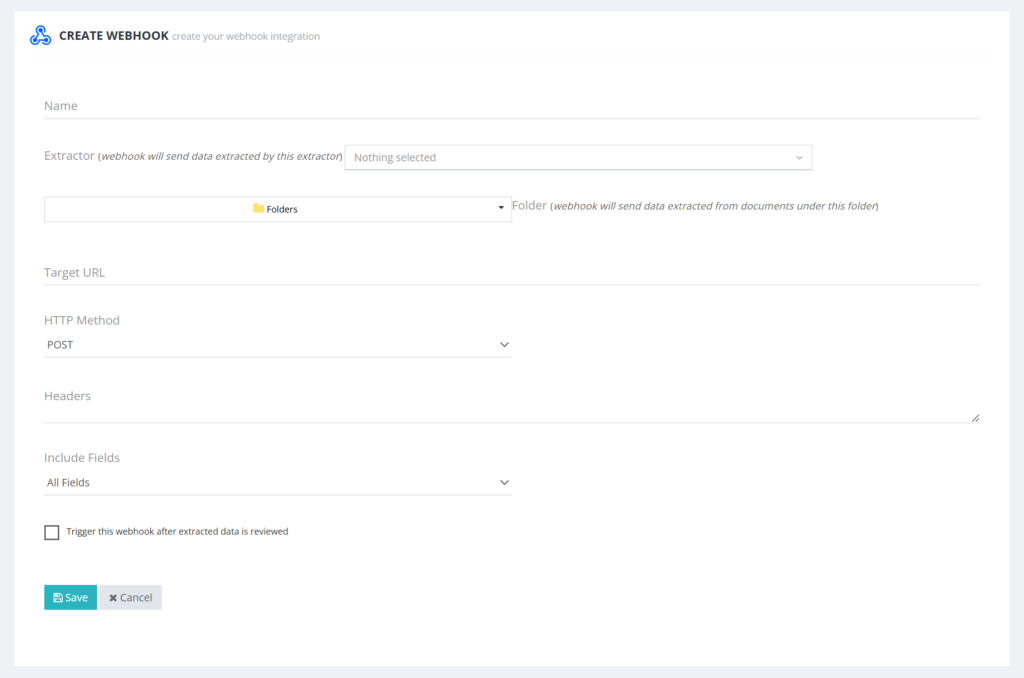
Step 3: Basic Configuration
Name: Give your webhook a descriptive name so you can easily identify it later.
Select Extractor: Choose the specific extractor you want this webhook to work with.
Select Folders: Select the folder(s) where the uploaded documents should trigger the webhook.
Step 4: Set the Destination
Target URL: Enter the destination URL where the extracted data should be sent.
Step 5: Filter Fields (Optional)
If you do not want to send all the extracted data, use the Include Fields section. Here, you can select only the specific fields you want to be transmitted to your Target URL.
Step 6: Save and Test
Once all details are filled in, click Save. You can then use the test option to ensure that the connection is working correctly and your data is being delivered as expected.
If you would like to read more about these or try making the first move toward improving your operations, do not hesitate to contact us today! Follow this link to schedule a demo and sign up.
Connect Algodocs with viaSocket
This guide explains how to connect Algodocs with viaSocket and use viaSocket actions to automatically upload and process documents in Algodocs.
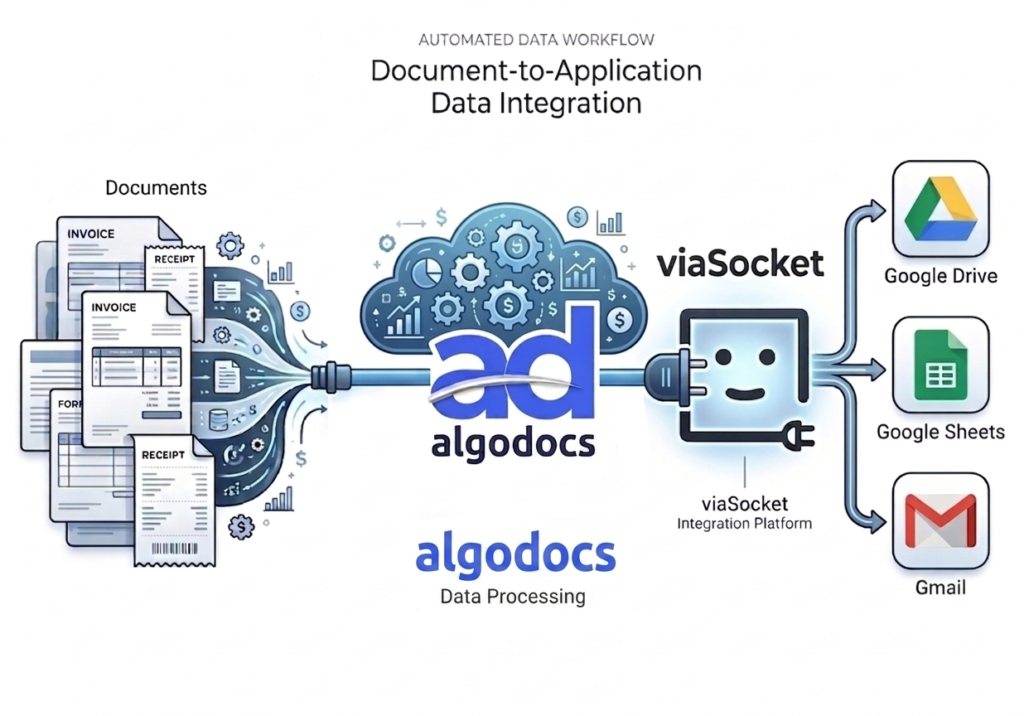
Algodocs allows you to extract structured data from documents such as invoices, receipts, forms, and contracts. Using viaSocket, you can automatically send documents from other apps to Algodocs for processing.
Prerequisites
Before connecting Algodocs with viaSocket, make sure you have:
- A viaSocket account
- An Algodocs account
- Algodocs Email Address
- Algodocs API Key
- Extractor ID
- Folder ID
Step 1 — Get Algodocs API Credentials
Follow these steps to get your Algodocs API credentials.
- Log in to your Algodocs account.
- Go to:
Integrations → Rest API
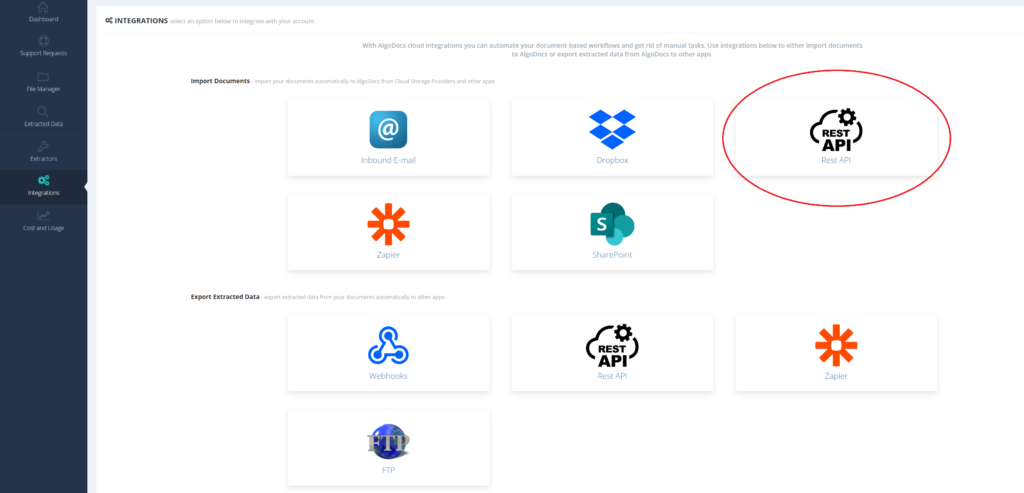
- Copy the following:
– Email Address
– API Key
You will need these credentials to connect Algodocs with viaSocket.
Step 2 — Create a Workflow in viaSocket
- Log in to your viaSocket account.
- Click: Create Workflow
- Select a trigger app.
Example triggers:
- Webhook
- Google Drive New File
- Email Attachment Received
- New Record in CRM
4. Configure the trigger.
5. Click: Continue
Step 3 — Add Algodocs Action
- Click: Add Action.
- Search for: Algodocs.
- Select Algodocs.
- Choose the available action: Upload Document.
Step 4 — Connect Algodocs Account
- Click: Connect Account
- Enter the following details: Email Address, API Key
- Click: Connect
Your Algodocs account will now be connected to viaSocket.
Step 5 — Configure Upload Document Action
After connecting your account, configure the action.
Fill in the required fields.
Required Fields:
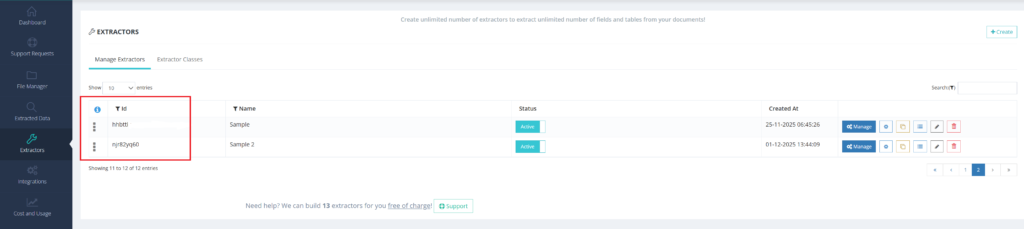
- Extractor ID
Select or enter the Extractor ID used for document processing.
- Go to the ‘Extractors’ page and copy the ID from the ‘ID’ field located to the left of the extractor name you need.
2. Folder ID
Enter the Folder ID where documents will be uploaded.
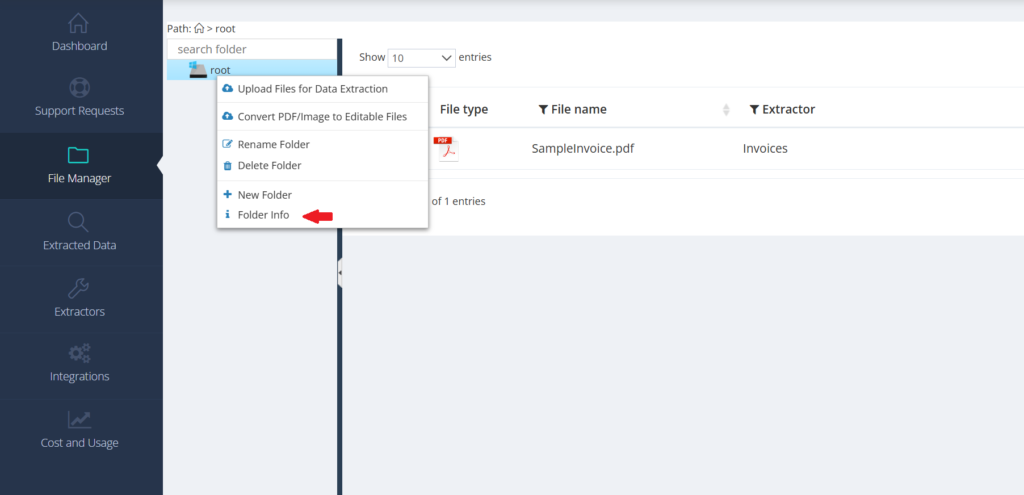
- How to find the Folder ID:
- Right-click on the folder you wish to get the ID for.
- Select “Folder Info” from the menu.
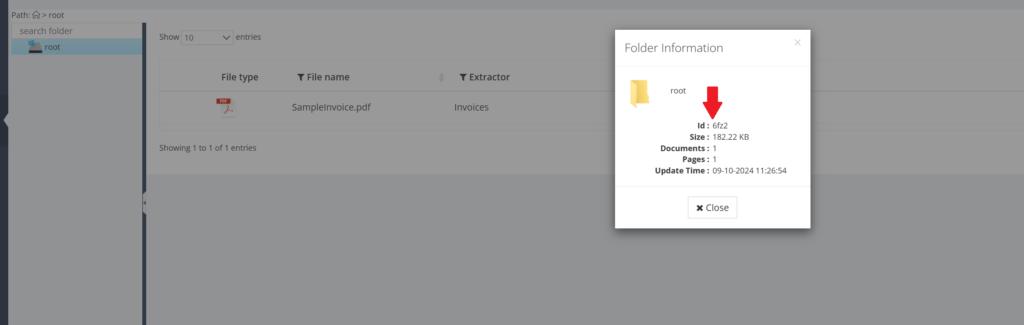
3. In the window that appears, the value shown next to “Id:” is the unique ID of that folder.
File URL
Provide the URL of the document you want to upload.
The file must be publicly accessible.
File Name (Optional)
Provide a custom file name for the uploaded document.
Example: Invoice_January.pdf
Step 6 — Test the Action
Click: Test Action
- viaSocket will upload the document to Algodocs.
- If the test is successful, the document will appear inside your Algodocs folder.
Step 7 — Publish Workflow
After testing successfully:
Click: Publish Workflow
Your workflow is now active.
Documents will automatically be uploaded to Algodocs whenever the trigger runs.
Algodocs Actions in viaSocket
Algodocs currently supports the following action:
Upload Document
This action uploads a document to Algodocs and starts the extraction process automatically.
Required Inputs
- Email Address
- API Key
- Extractor ID
- Folder ID
- File URL
Optional Inputs
- File Name
Example Workflow
Automatically Process Invoices
Trigger: New File in Google Drive
Action: Upload Document in Algodocs
Result:
- File automatically uploaded to Algodocs
- Data extraction starts automatically
Supported File Types
Algodocs supports common document formats such as:
- PNG
- JPG
- JPEG
- TIFF
Troubleshooting
Authentication Failed
Make sure:
- Email address is correct
- API key is correct
Document Not Uploading
Check:
- File URL is publicly accessible
- Extractor ID is correct
- Folder ID is correct
Notes
- Algodocs supports actions only in viaSocket.
- Algodocs workflows must be triggered by another application.
- Document extraction happens automatically after upload.
Export Extracted Data To Your FTP Server Using Algodocs FTP Integration
How to Export Extracted Data to Your FTP/SFTP Server
Follow these steps to seamlessly export your processed data from Algodocs directly to your own server.
Step 1: Access FTP Integration Settings
Log in to your account, go to the Integrations section in the side menu, and select FTP.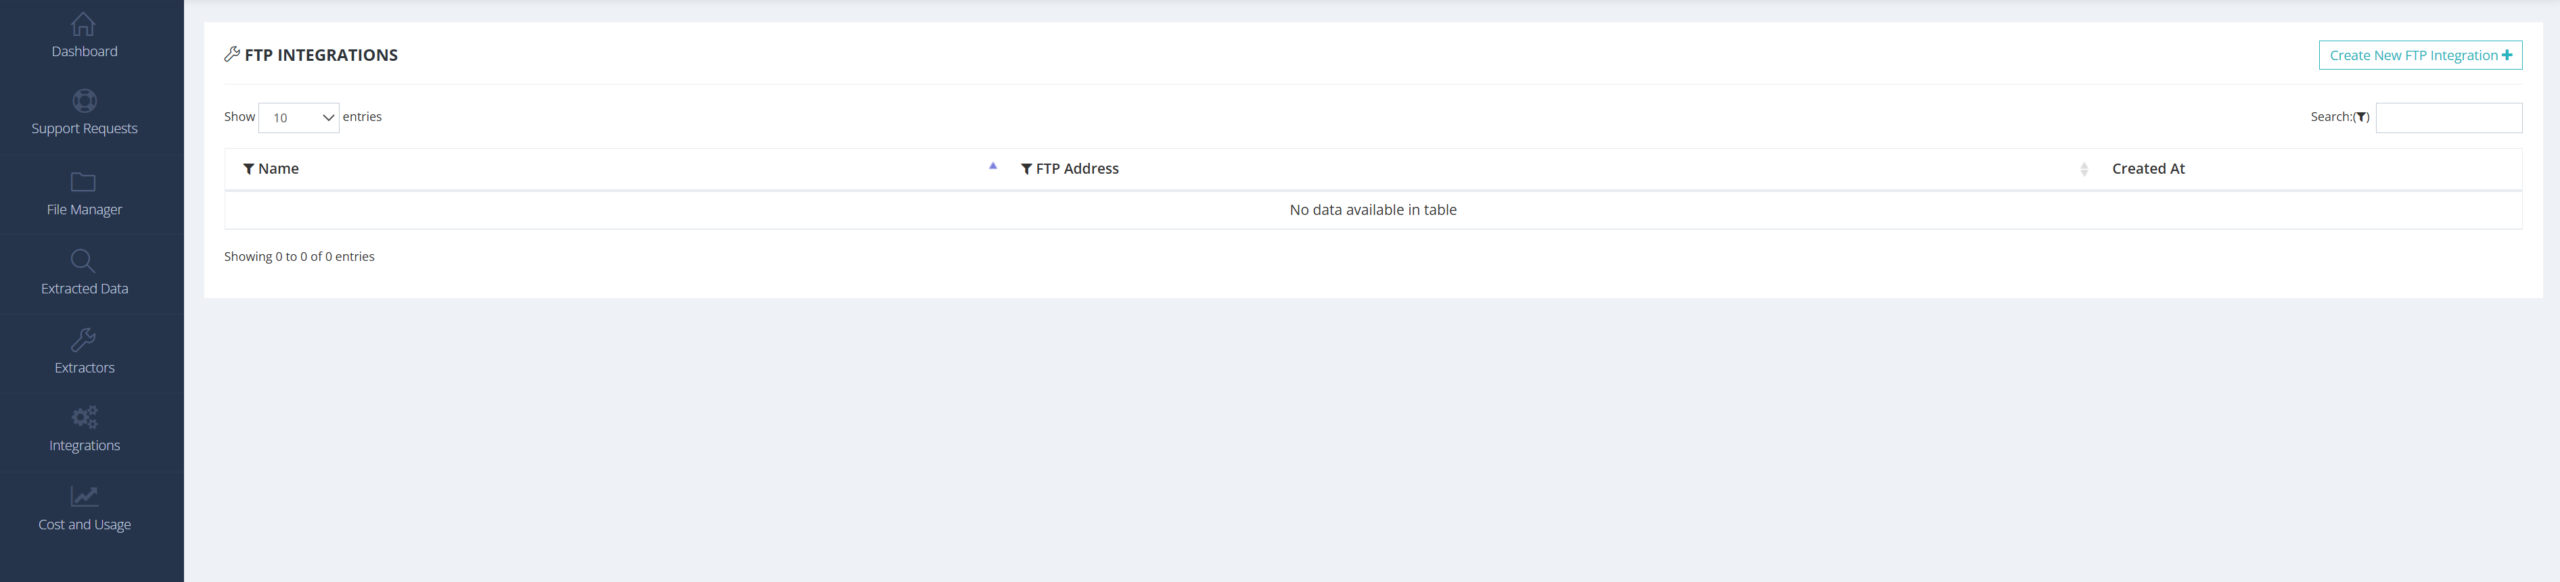
Step 2: Create a New Integration
Click to create a new FTP integration and provide the following details:
Name: Give your integration a clear name for identification.
Select Extractor: Choose the extractor that will provide the data you want to export.
Select Folders: Choose the specific folder(s) from which the extracted data should be sent. You can select all folders or just specific ones.
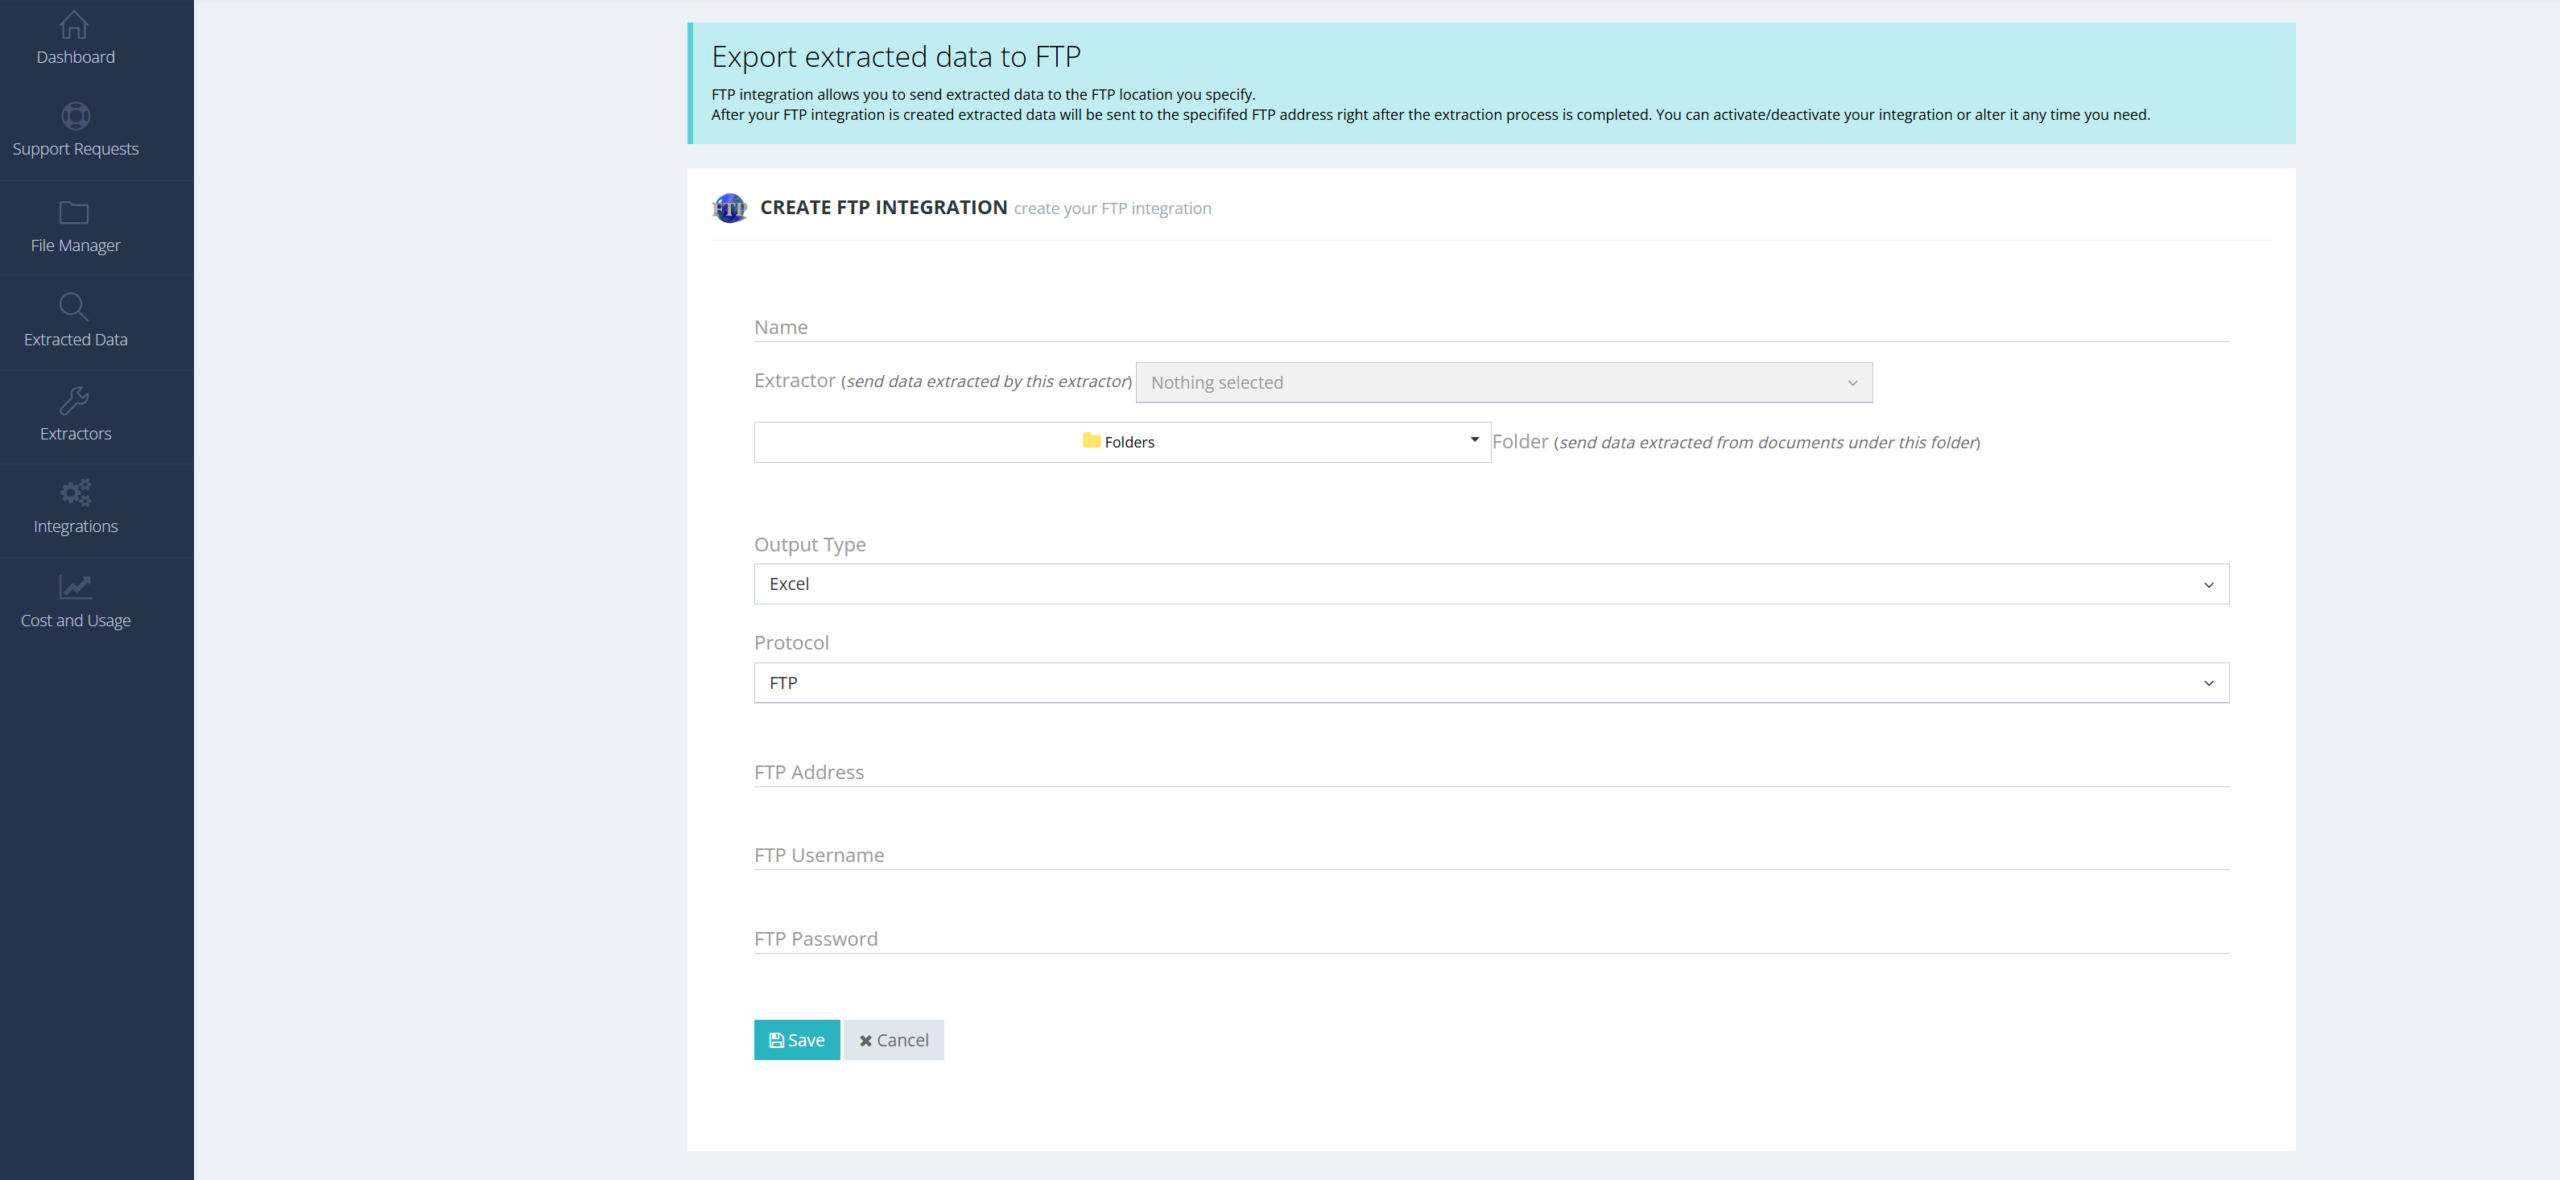
Step 3: Define Output and Protocol
Output File Type: Select your desired file format (e.g., Excel, CSV, JSON).
Protocol: Choose between FTP or SFTP based on your server’s security requirements.
Step 4: Enter Server Credentials
FTP Address: Input your server’s address.
Tip: To export to a specific directory, include the file path directly in the address (e.g.,
[ftp.yourserver.com/folder_name](https://ftp.yourserver.com/folder_name)).Credentials: Enter your username and password for the server.
Step 5: Save and Test
Click Save & Test. Algodocs will attempt to send a test file to your server to verify the connection.
Step 6: Verify Exported Data
Open your FTP application (such as FileZilla) to confirm the data has arrived. You should see your exported file in the root directory or the specific folder path you defined.
If you would like to read more about these or try making the first move toward improving your operations, do not hesitate to contact us today! Follow this link to schedule a demo and sign up.
Use Zapier to connect Algodocs with thousands of apps
How to Connect Algodocs with Zapier
Follow these steps to create an automated workflow and send your extracted data to hundreds of other apps like Google Drive or Google Sheets.
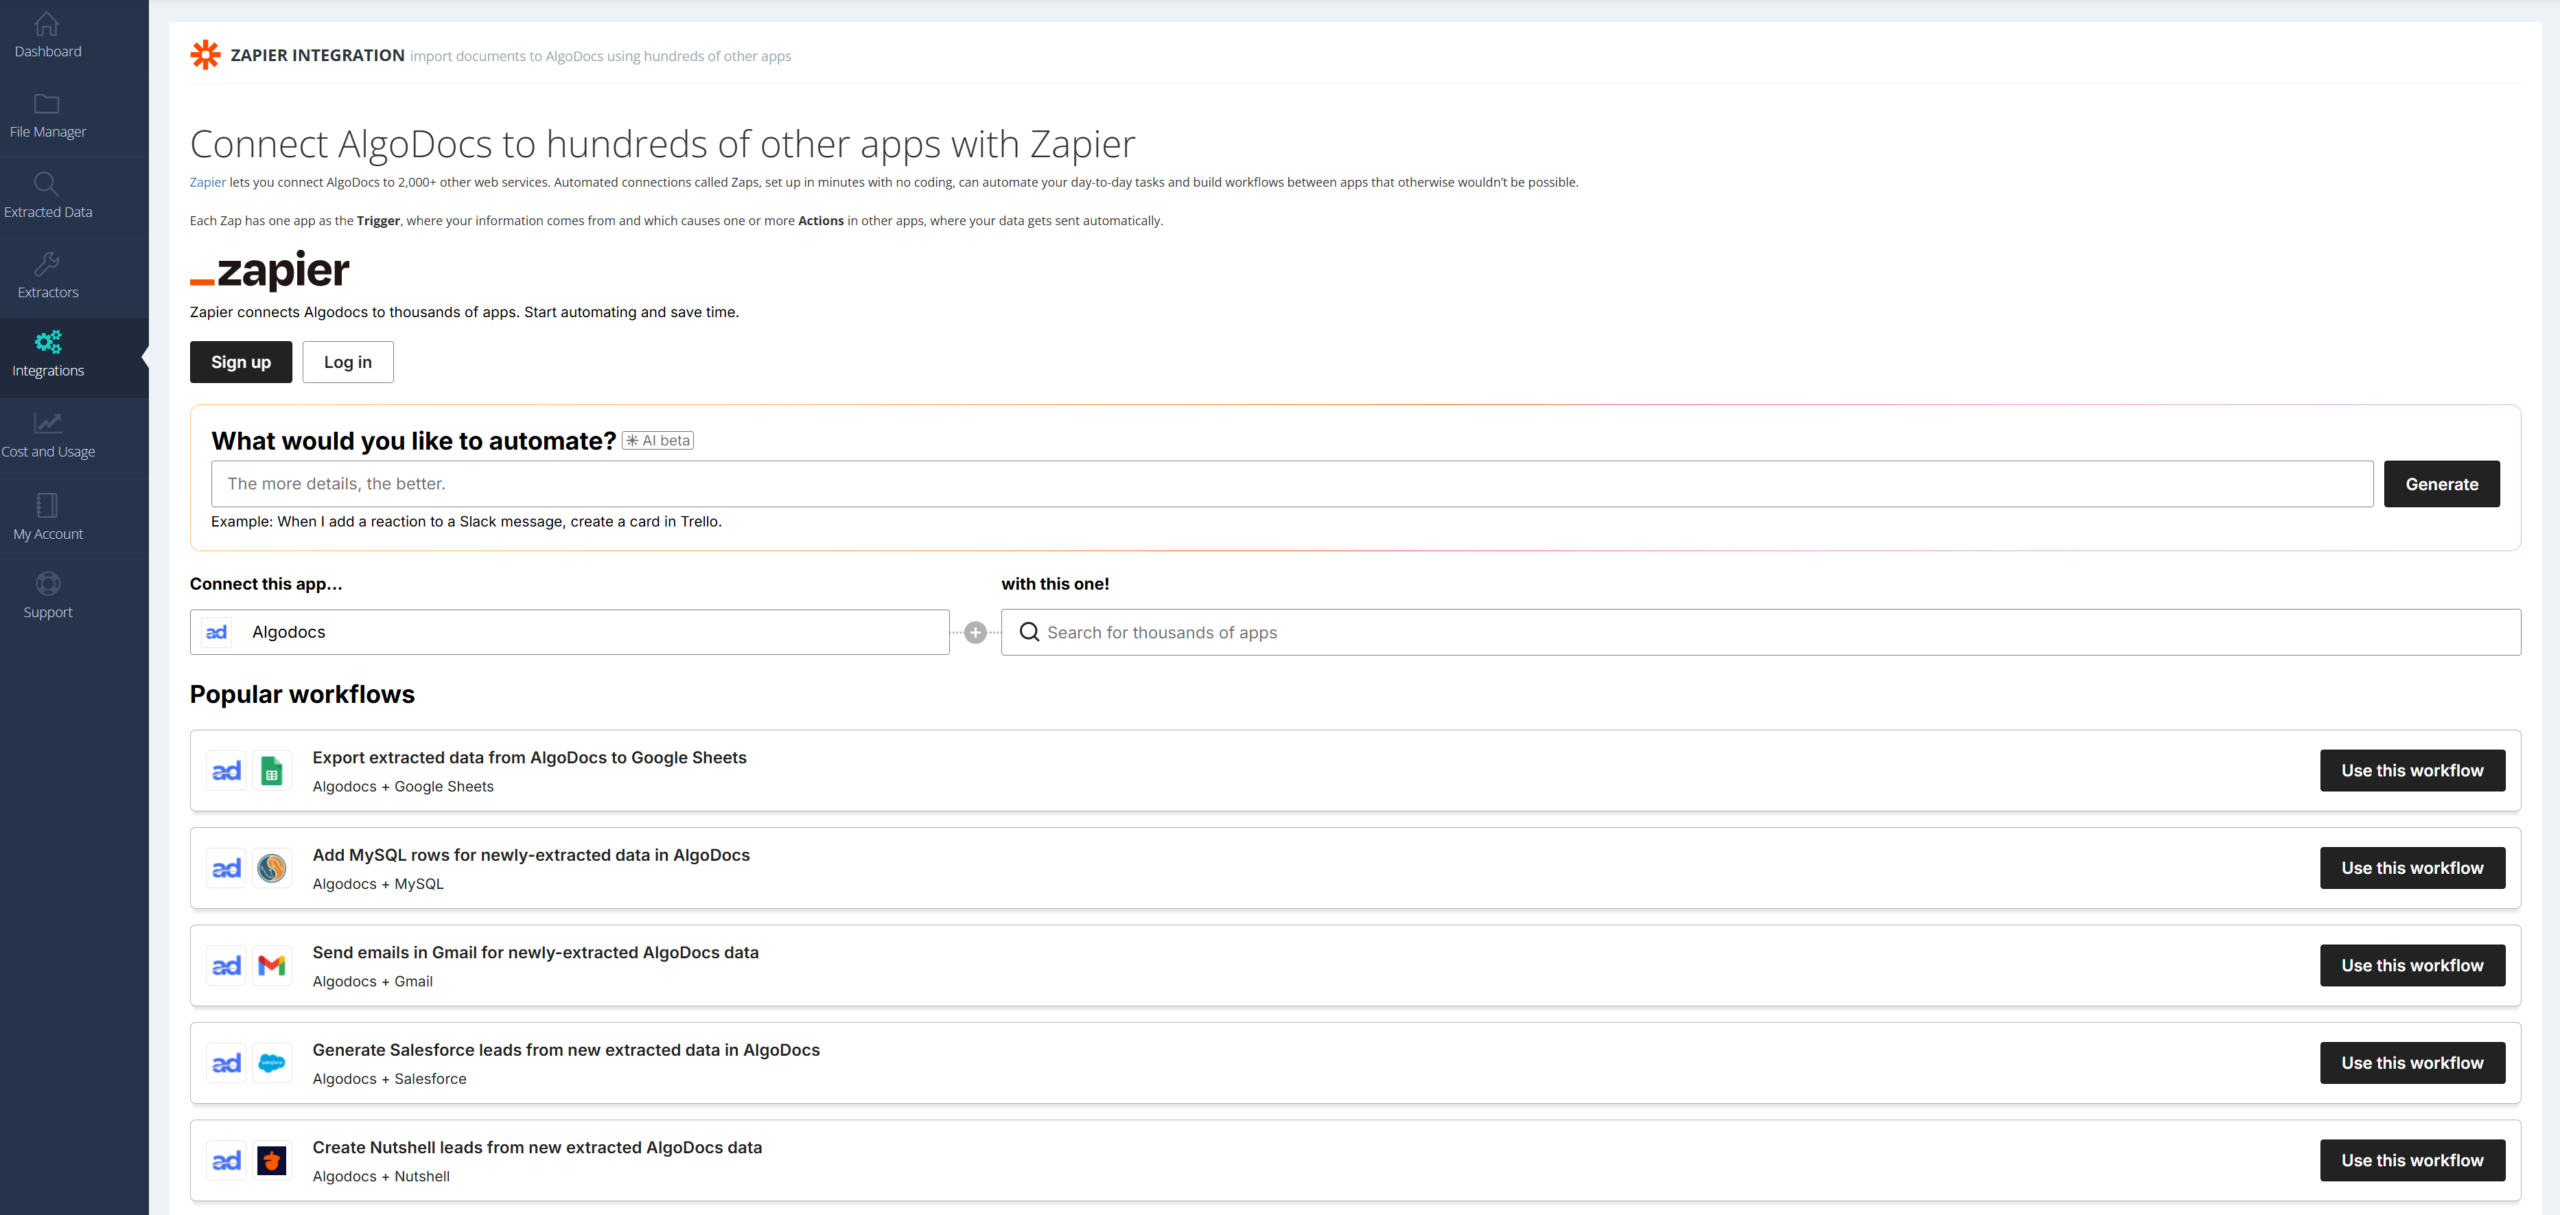
Step 1: Start the Integration
Log in to your Algodocs account.
Navigate to the Integrations section in the side menu.
Select Zapier from the list of available integrations.
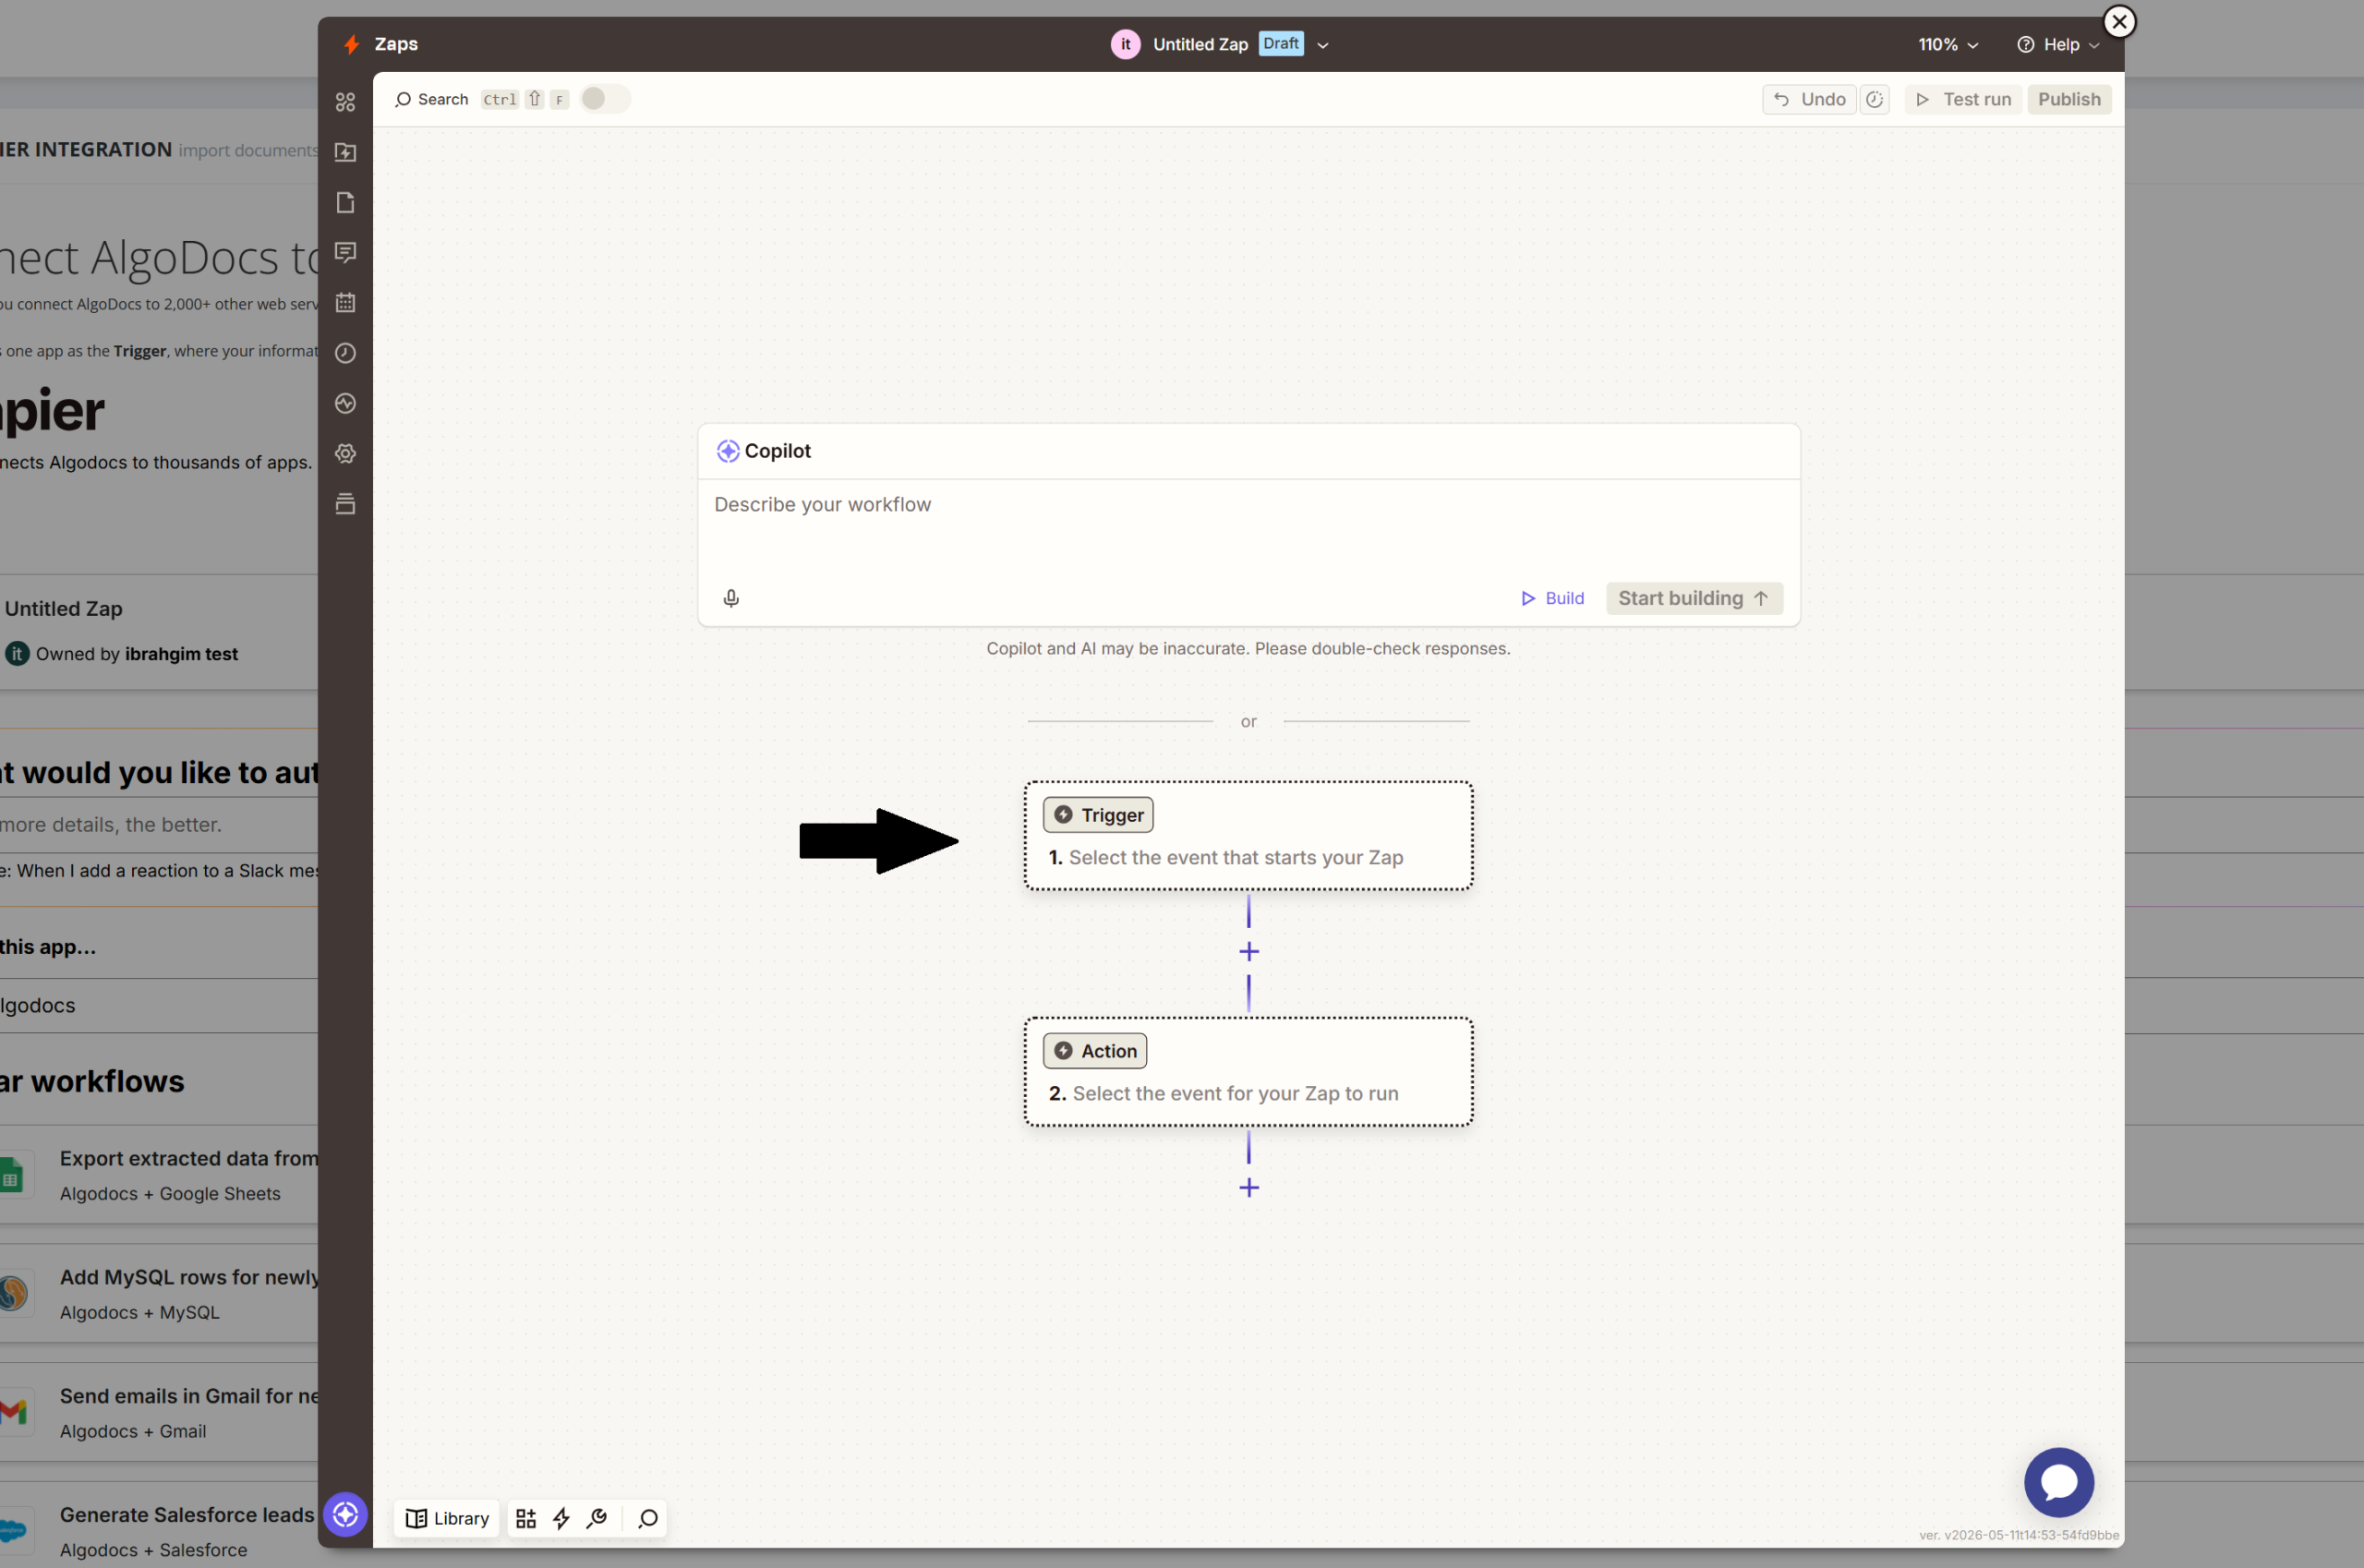
Step 2: Create Your Workflow in Zapier
Log in to your Zapier account.
Click on “Create a Zap” (or Create a Workflow).
In the Trigger step, search for “Algodocs” and select the Trigger Event (the action that starts the process).
Step 3: Authenticate Your Account
When prompted to connect your account, you will need your API Key.
Go to https://app.algodocs.com/restapi to find and copy your unique API Key.
Return to Zapier, paste the key into the Account connection window, and click Continue.
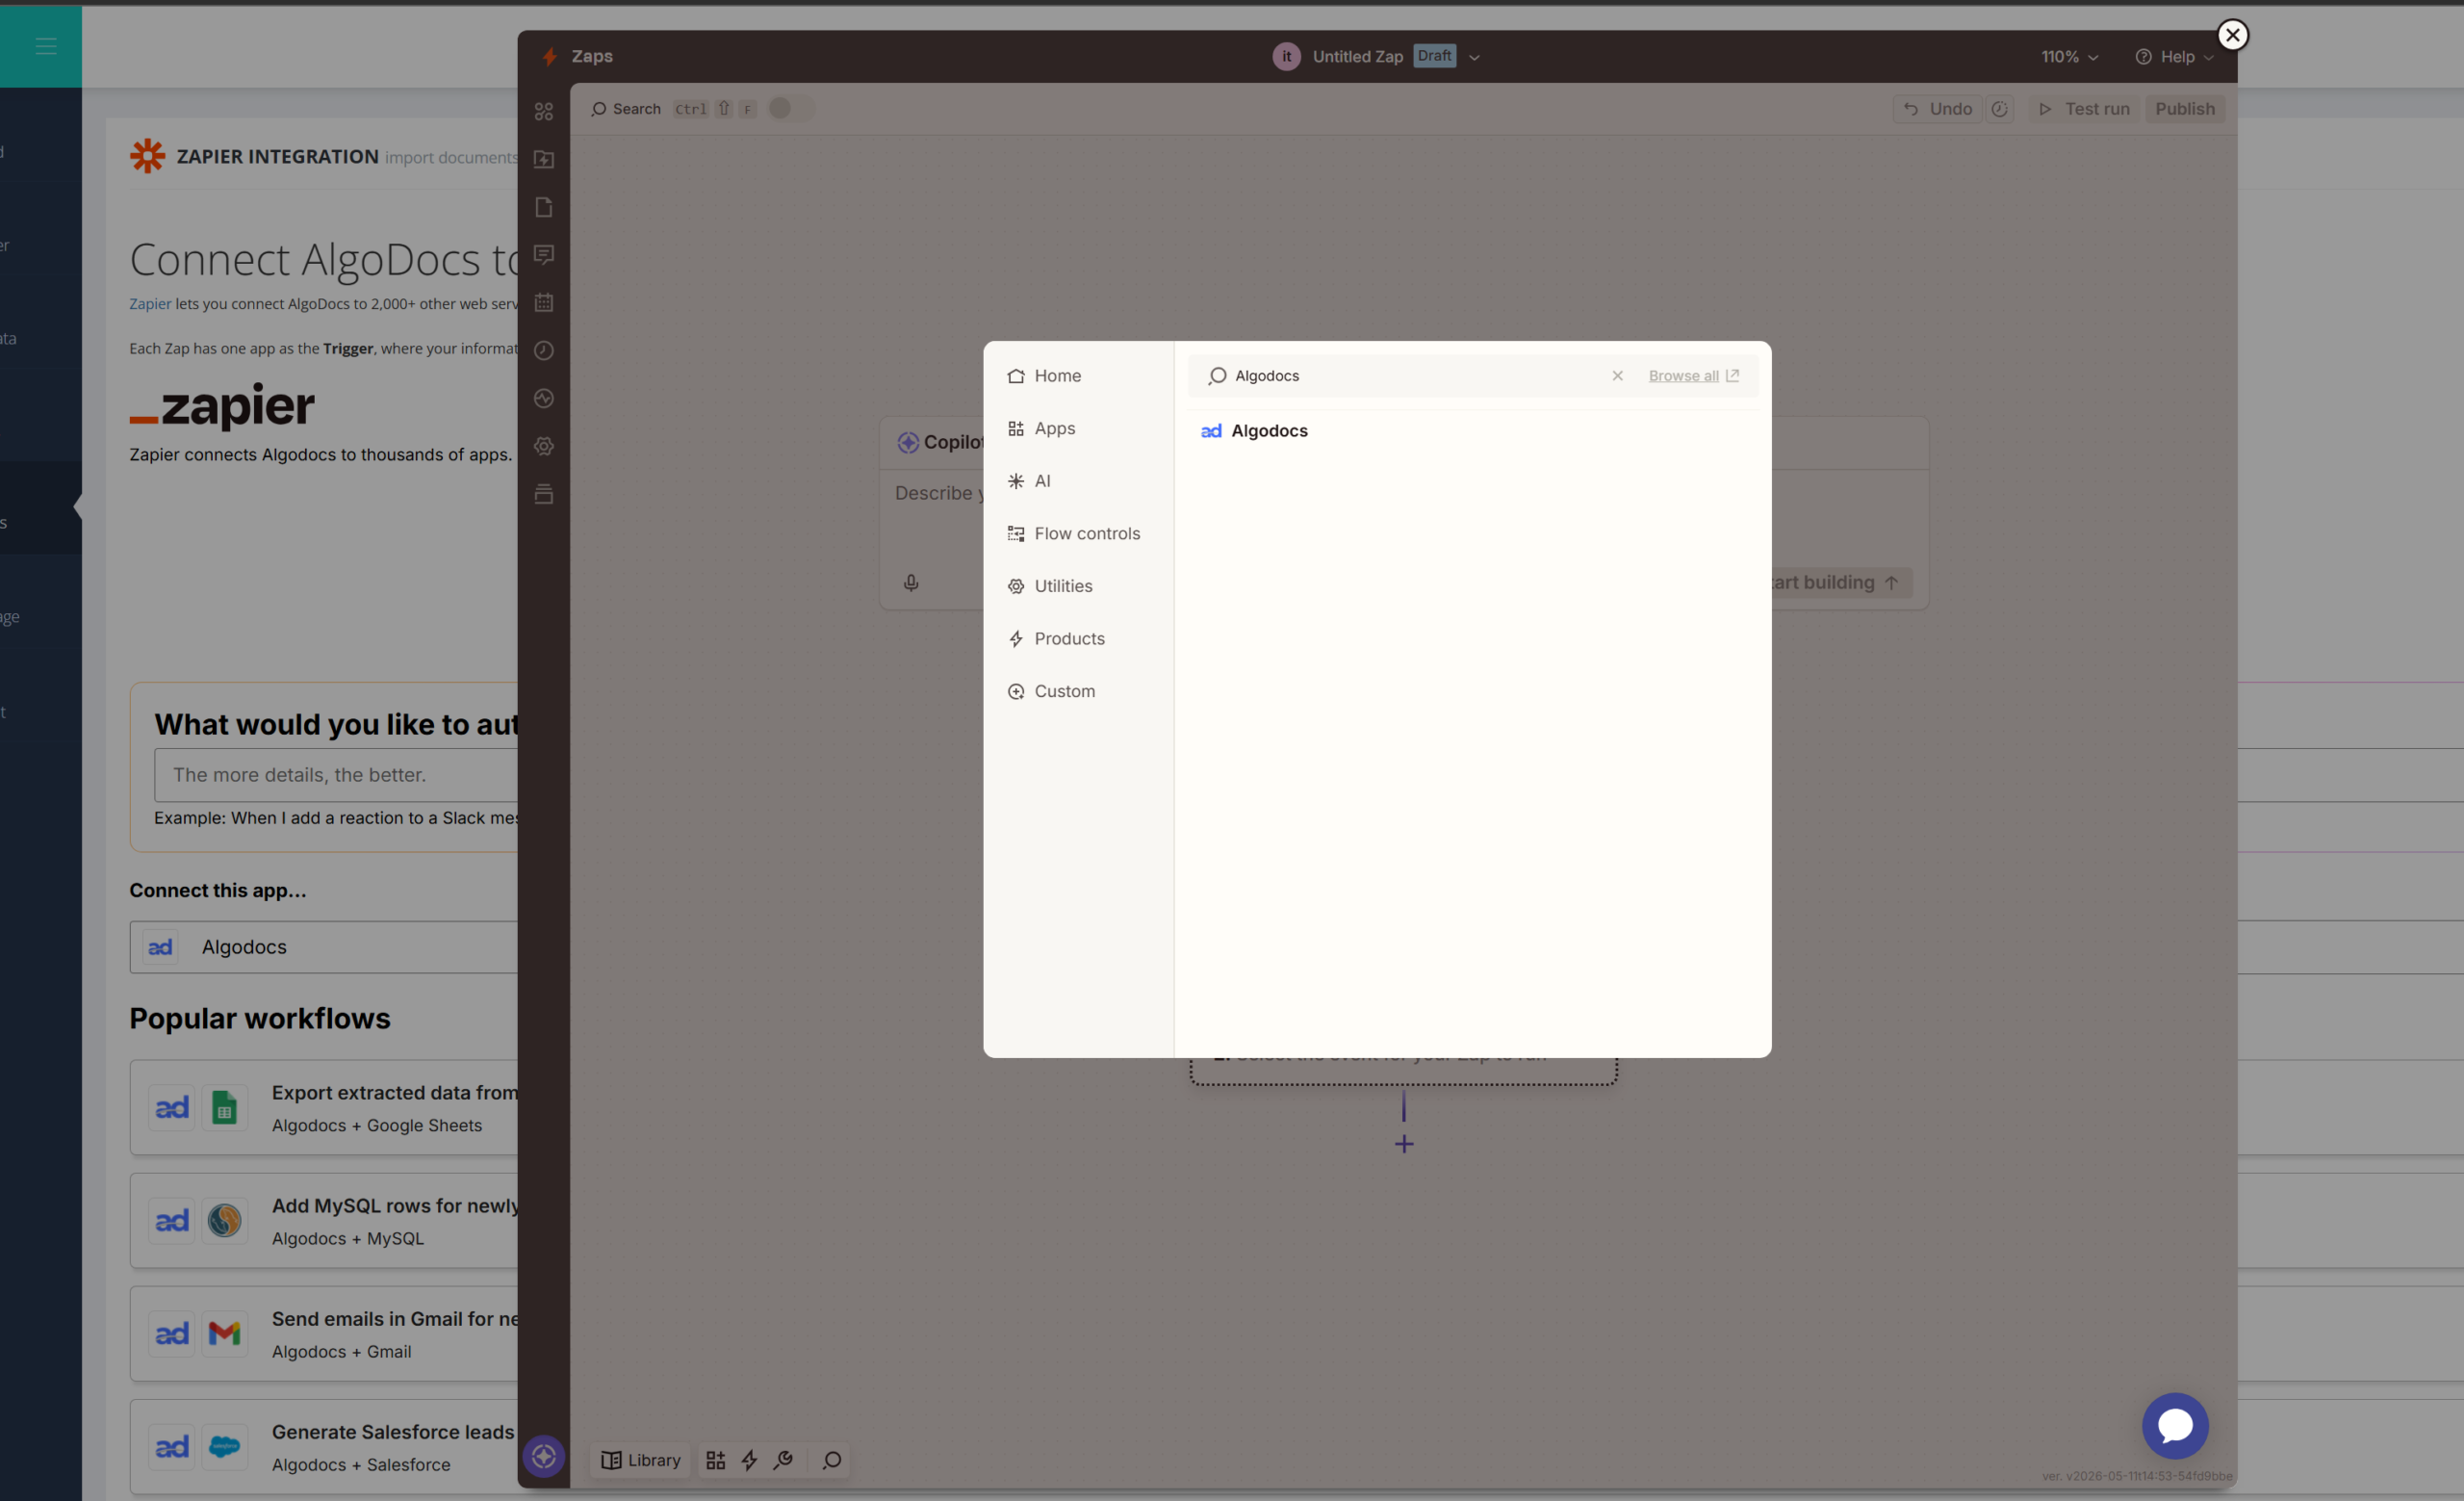
Step 4: Configure the Data Source
Choose the Extractor you want Zapier to monitor.
Select the specific Folder where your documents are located.
Note: You can choose a specific folder for targeted automation or select all folders depending on your needs.
Click Continue and then select Test Trigger to ensure Zapier can see your extracted data.
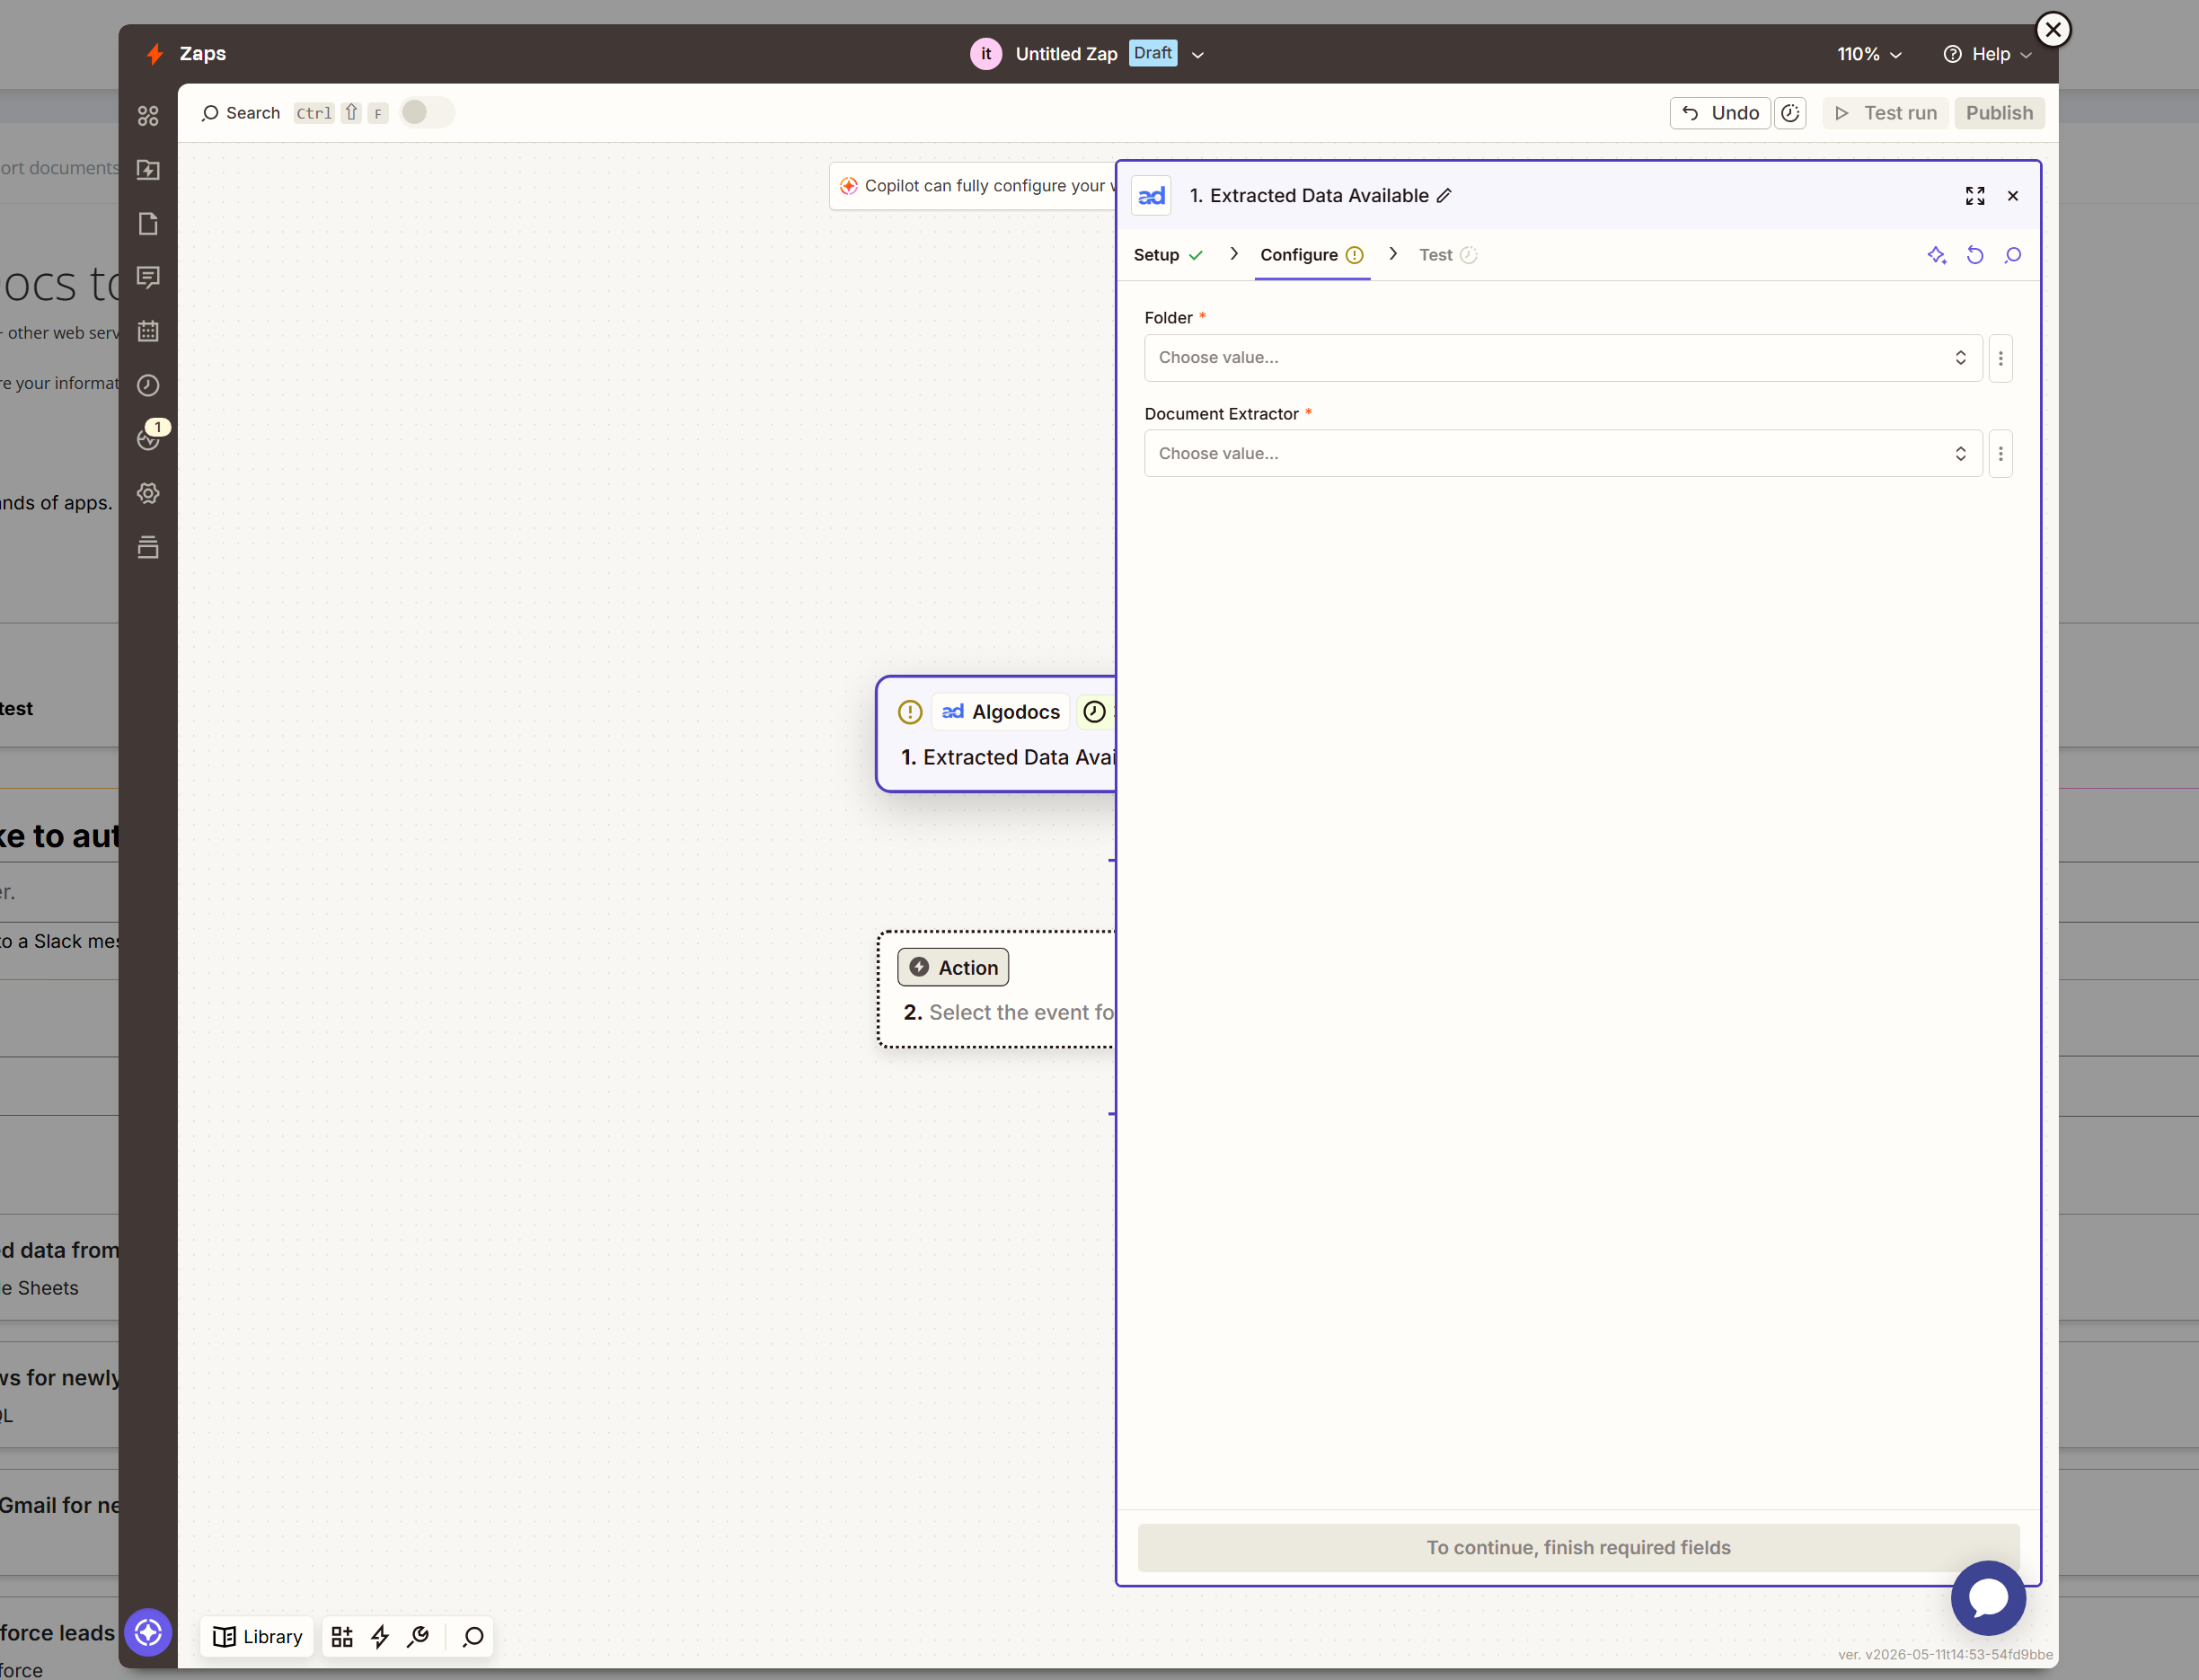
Step 5: Set Up the Action (Destination)
In the Action step, search for the app where you want to send your data (e.g., Google Drive, Google Sheets, etc.).
Choose your Action Event (e.g., “Create Spreadsheet Row” or “Upload File”).
Log in to the selected application to grant Zapier access.
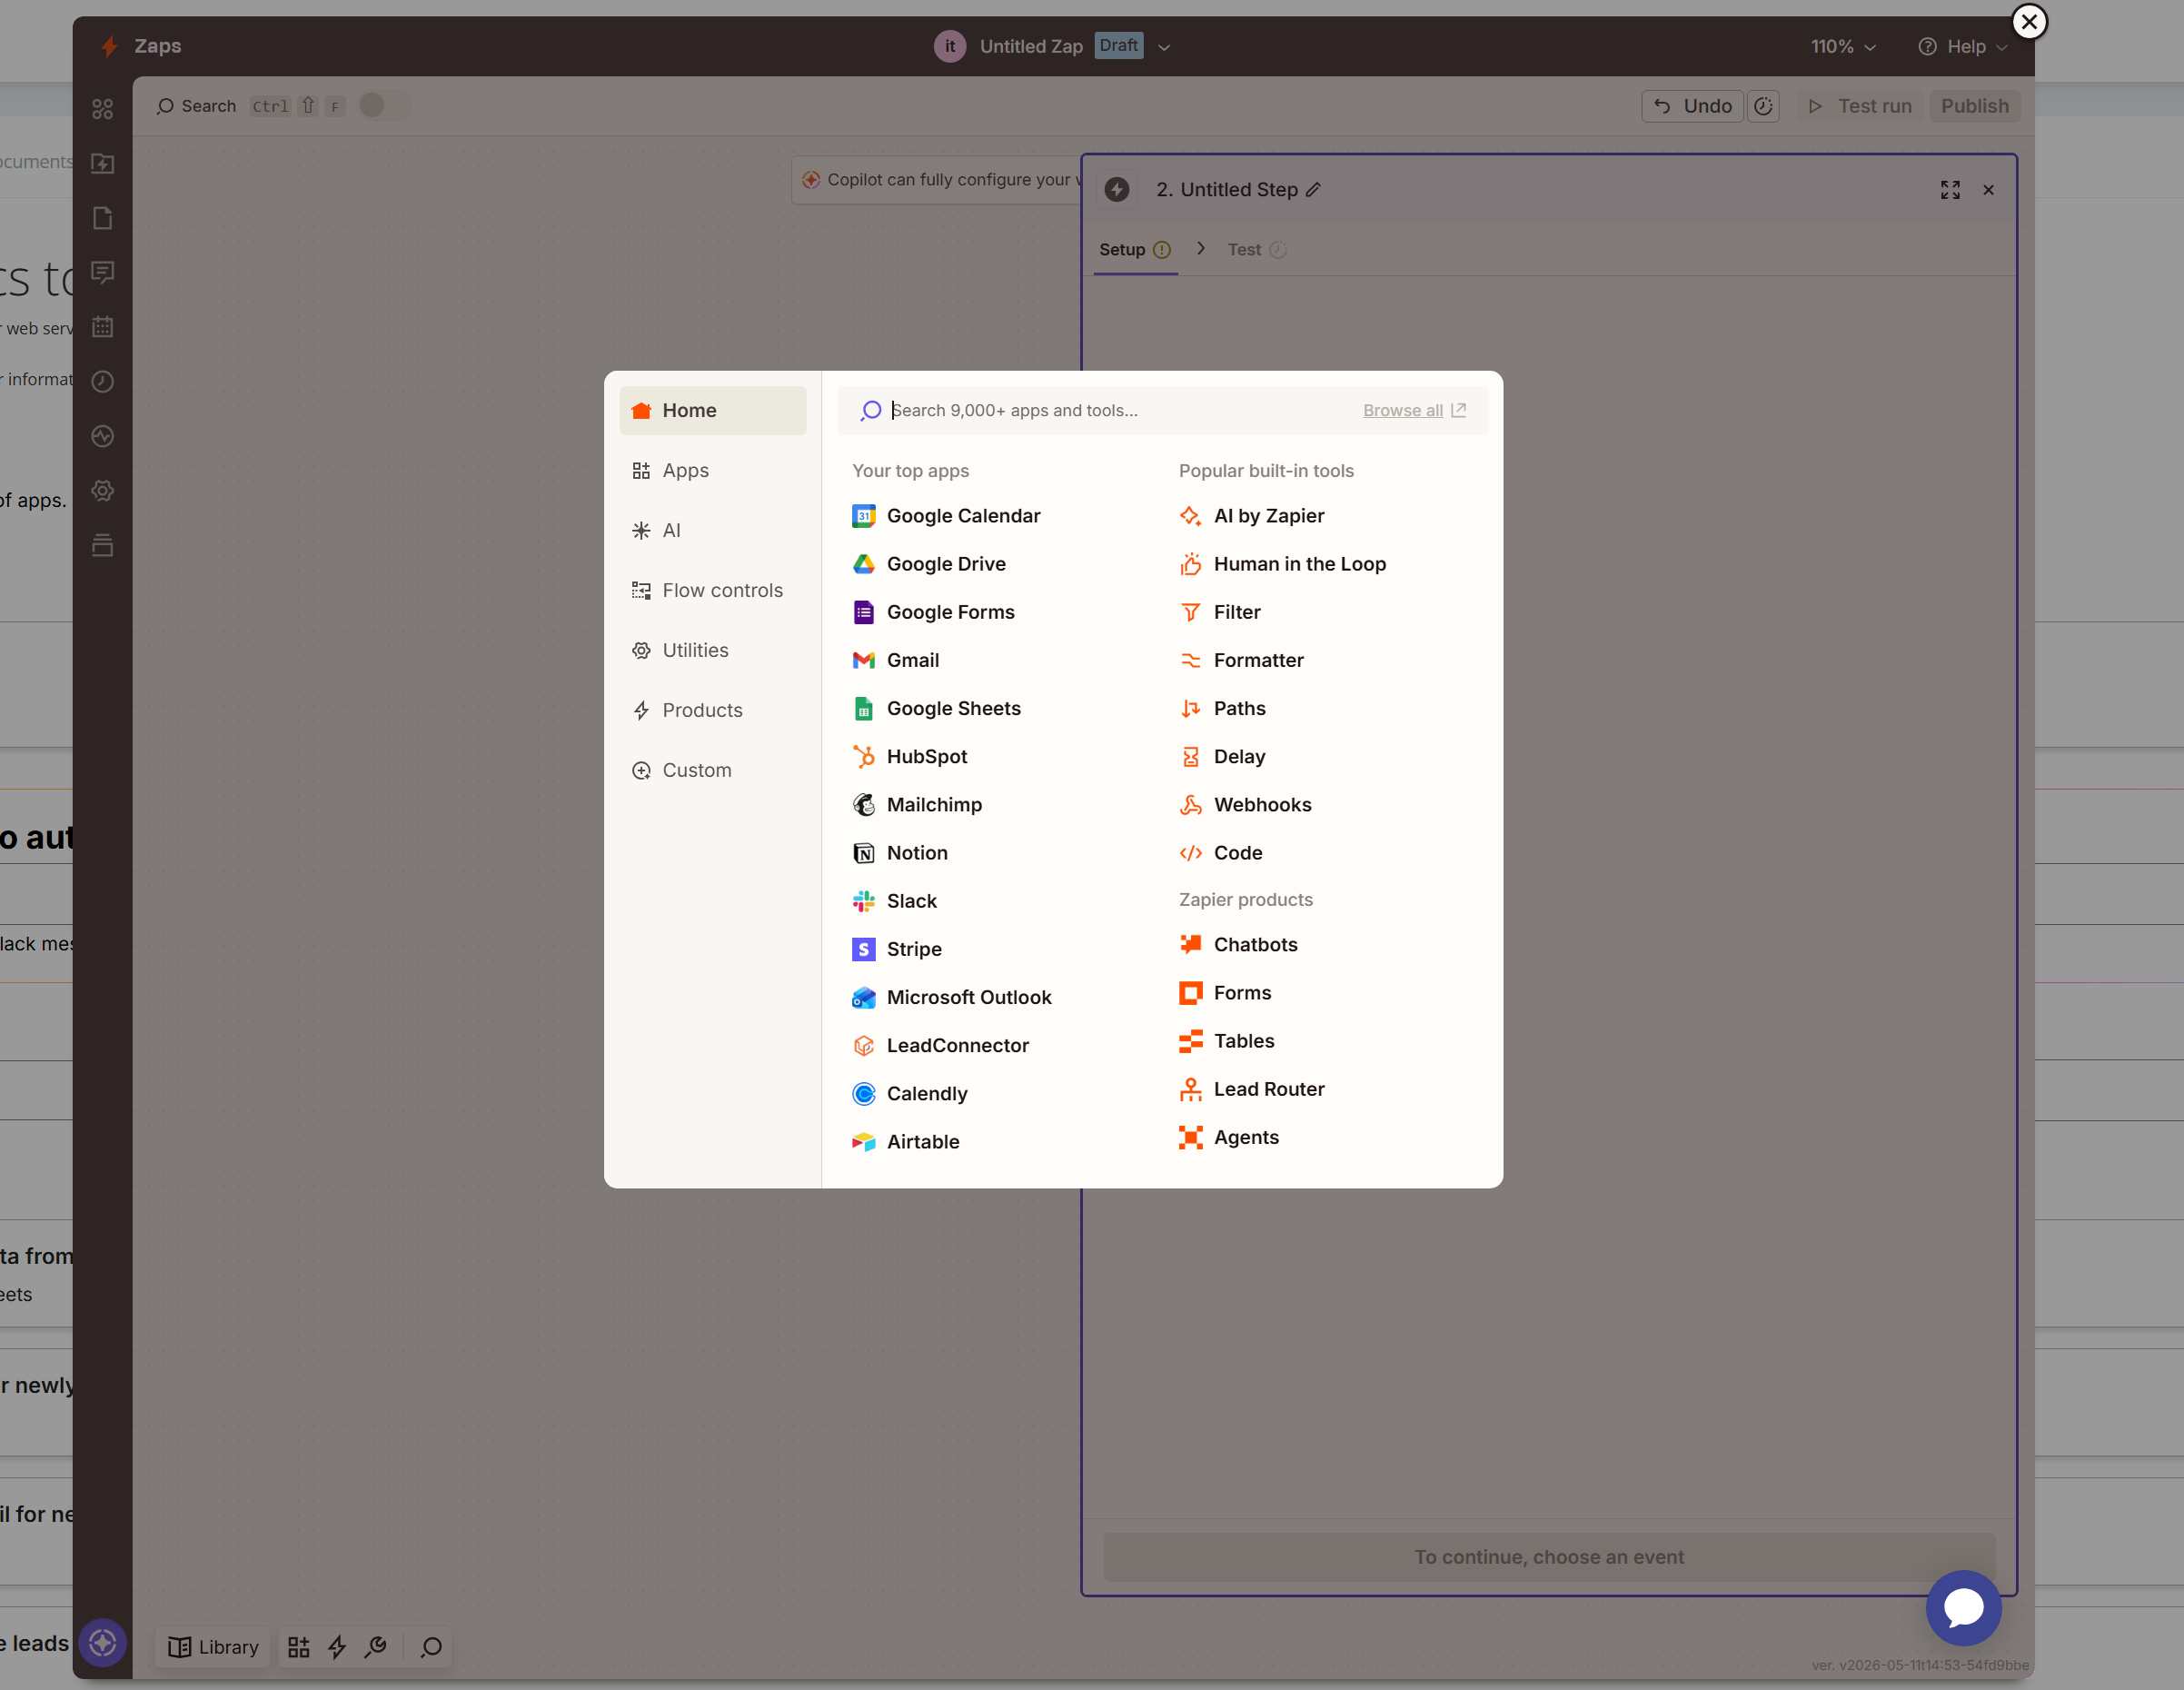
Step 6: Map Your Fields and Test
Fill in the required fields by matching the data extracted from Algodocs to the columns or files in your destination app.
Click Continue and run a Test Action.
Once the test is successful, Publish your Zap to go live!
Export Extracted Data from AlgoDocs to Google Sheets using Zapier
Automate AlgoDocs to Gmail: Export Data with Zapier
If you would like to read more about these or try making the first move toward improving your operations, do not hesitate to contact us today! Follow this link to schedule a demo and sign up.
Integrate your application with Algodocs via API
API
Integrate Algodocs directly into your systems with a robust API (supports multiple auth methods, including OAuth 2.0).
Typical operations
- Import documents from local files.
- Import documents via public URLs.
- Retrieve extracted data for a single document.
- Retrieve extracted data for multiple documents.
Refer to the full API reference in your developer portal for endpoints, payloads, and examples.
Complete API documentation and steps are available at https://api.algodocs.com
If you would like to read more about these or try making the first move toward improving your operations, do not hesitate to contact us today! Follow this link to schedule a demo and sign up.
Accounting & Billing
Manage plans, invoices, payment methods, and usage. Understand page quotas and how processing maps to billing.
TrustHow secure is my data with Algodocs?
Algodocs secures services, data, and access. All traffic between you and Algodocs is SSL-encrypted.
Core protections
- Encrypted in transit via SSL/TLS
- Security program & controls across services, data, and access
Compliance posture
- ISO 27001 (ISMS) & ISO 9001 (QMS) certified
- GDPR-ready with supporting policies
See Security & Compliance for certificates and details.
Is Algodocs GDPR Compliant?
Yes. EU-based companies and EU citizens can use Algodocs under GDPR.
Where to learn more
Your rights
Review privacy rights and contact methods in the Privacy Policy.
How the pricing system works
Basics
- Subscriptions: monthly or annual
- Quota: plans include a page-processing allowance
Savings
- Annual plans save the cost of two months vs monthly
See the Pricing page for current tiers and add-ons.
How can I update my billing details?
Where to update
- Go to My Account → Invoices & Billing
- Open the Billing Details section
- Edit and Save
When you pay
When you upgrade to a paid subscription, billing info is saved automatically during checkout—update it later anytime in Billing Details.
How can I get my invoices?
Find your invoices
- Go to My Account → Invoices & Billing
- Check the INVOICES table
- Download the invoice you need
Timing
Invoices are generated within 48 hours after payment and then appear in your account for download.
Auto-generatedHow to update my credit card information
Add / change card
- Go to My Account → Credit Card
- Add a new card, or update/remove the existing one
Notes
- You can save a card during upgrade by selecting Save payment details
- If no card is saved, auto-renewal will not occur
Keep a valid card on file to avoid service interruption at renewal.
Account Setting
Reset passwords, add users, set retention, and configure timezone/date display so UI timestamps match your locale.
Signing Up with Email
Navigate to the Sign Up page, enter your email address, and click the Sign Up button. An email verification code page will appear; check your inbox and enter the verification code into the designated field on this screen. On the following page, set your Algodocs account name and password. After completing this step, your account will be successfully created. We highly recommend watching the tutorial video that appears when you log in for the first time.
Signing Up with Google
Navigate to the Sign Up page and click the Sign Up with Google button. In the pop-up window that appears, select the email address you wish to use for registration. After this step, your account will be successfully created. We highly recommend watching the tutorial video that appears when you log in for the first time.
Reset my password
You can reset your Algodocs password in two ways:
- Changing an existing password: After logging into your account, click on Profile in the top-right corner, then select the Email Address & Password section. Click the Change Password button. You can update your password by entering your current password followed by your new password.
- If you forgot your password: Click on Forgot Password on the login screen. Enter your email address on the page that opens, then check your inbox. Click the link in the email sent by Algodocs to create your new password. If you do not see the email in your inbox, please check your spam folder.
Update account owner information
The account owner profile is used across integrations (e.g., Zapier) to identify your account. Update it anytime from profile → Personal details.
Add users in my account
Algodocs supports multiple users per account. Manage users via your username (top-right) → Users to add, edit, disable/enable, or remove users.
- When you add a user, a password is sent to the email you enter—use a valid address.
- Users can change their passwords later.
- No hard limit on user count; usage quota is shared at the account level (pages processed), not per-user.
How long is my data retained?
Click on Settings from the left menu. On the page that opens, you can select how long your data will be kept from the Data Retention section. The maximum retention period is 30 days for free subscriptions and 60 days for paid subscriptions.
Please contact support@algodocs.com if you need to keep your data for a longer period.
Credit Alerts
To delete your account, log in and navigate to Settings from the left menu, and select Credit Alerts. Here, you can specify the email address that should receive warning messages and set the quota usage percentage threshold that triggers the alert.
Delete account
To delete your account, log in and navigate to Settings from the left menu. Go to the Delete Account tab and click the red Delete Account button. Please note that completing this action will permanently delete your account along with all associated documents and extractors.
Two-Factor Authentication (2FA)
- Enabling Two-Factor Authentication:Log in to your account, click on Profile in the top-right corner, and navigate to the Two-Factor Authentication tab. Click the Set up an app button, then scan the displayed QR code using any authenticator app (such as Google Authenticator or Microsoft Authenticator). Enter the verification code generated by the app into the required field and click Enable Two-Factor Authentication.
- Disabling Two-Factor Authentication:To deactivate 2FA, return to the same page and click the Disable Two-Factor Authentication button located in the center of the screen.
Webhook alerts
Log in to your account, navigate to Settings from the left menu, and select Webhook Alerts. Enter the email address where you wish to receive notifications in the Send Alerts To field, and ensure the Enable Alerts checkbox is selected.
When this option is enabled, you will receive an email whenever a webhook fails. Any target server response code starting with 4XX or 5XX is considered a webhook failure.
Note:Due to the content of alert messages, emails may occasionally be directed to your spam folder. Please check your spam folder and mark the email as "Not Spam" to ensure future delivery.
Set the display date format
Choose how dates appear in the app UI from your account. Click on Settings from the left menu, and on the page that opens, you can set your preferred format next to Display Date Format.
Note: This affects only on-screen dates in your account (it does not change the date formats extracted from documents).
Change my timezone
Your timezone is auto-detected at sign-up. You can change it by clicking on Settings from the left menu, then selecting your preferred timezone next to Time Zone on the page that opens.
Note: This controls account-level dates (e.g., upload timestamps) and does not affect dates extracted from documents.
